Black and Decker Steamer HS1300 User Manual
Here you can view all the pages of manual Black and Decker Steamer HS1300 User Manual. The Black and Decker manuals for Steamer are available online for free. You can easily download all the documents as PDF.
Page 1
Model
Modelo
Modèle
❑	HS1300
Please	Read	and	Save	 this	Use	 and	Care	 Book
Por	 favor	 lea	este	 instructivo	 antes	de	usar	 el	producto
Veuillez	 lire	et	conserver	 ce	guide	 d’entretien	 et	d’utilisation
Ultra-fast
pre-programmed

digital	 steamer
Olla	 digital	 de

vapor,	 programada

ultra	 rápida
Cuiseur-vapeur

numérique

ultra-rapide

et	 préprogrammé
Accesorios/Partes	(EE.UU/Canadá)
Accessories/Parts	(USA/Canada)
1-800-738-0245
Register 	your 	product 	online 	at...
Page 2
21
When using electrical appliances, basic safety precautions should always
be followed, including the following:
❑ Read all instructions.
❑ Do not touch hot surfaces. Use handles or knobs.
❑ To protect against a risk of electric shock, do not immerse cord, plug,
or base unit in water or other liquid.
❑ Close supervision is necessary when any appliance is used by or near
children.
❑ Unplug from outlet when not in use and before cleaning. Allow to cool
before putting on or taking off parts or...
Page 3
43
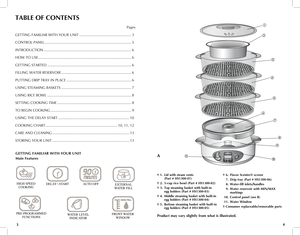
Product	may	vary	 slightly	 from	what	 is	illustrated.
†	 1.	Lid	 with	 steam	 vents
	 	 (Part	 #	HS1300-01)
†	 2.	5-cup	 rice	bowl	 (Part	#	HS1300-02)
†	 3.	Top	 steaming	 basket	with	built-in
	 	 egg	 holders	(Part	#	HS1300-03)
†	 4.	Middle	 steaming	 basket	with	built-in
	 	 egg	 holders	(Part	#	HS1300-04)
†	 5.	Bottom	 steaming	 basket	with	built-in
	 	 egg	 holders	(Part	#	HS1300-05)
†	 6.	Flavor	 Scenter®	 screen
	 7.	Drip	tray	(Part	 #	HS1300-06)
	 8.	Water-fill	 inlets/handles
	 9....
Page 4
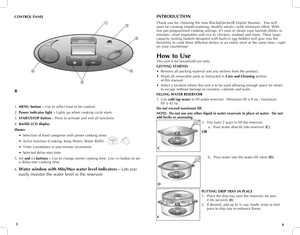
CONTROL	PANEL
1.  MENU	 button	–
Use to select food to be cooked.
2.  Power	 indicator	 light	–
Lights up when cooking cycle starts.
3.  START/STOP	 button	–
Press to activate and end all functions.
4.  Backlit	 LCD	display
Shows:
 • Selection of food categories with preset cooking times
  • Active function (Cooking, Keep Warm, Water Refill) -
  • Timer countdown in one-minute increments
  • Selected delay-start time
5.  (+)	 and	 (-)	buttons	 –
Use to change preset cooking time. Use (+) button...
Page 5
873.
Place herbs, spices, garlic or citrus slices on Flavor
Scenter® screen to give food to be cooked added
flavor (F). (See Flavor Scenter® tips.)
Tips	for	using	the	Flavor	Scenter
® 	screen
  •  Wet screen before adding seasonings
  •  Use whole or coarsely chopped herbs
  •  Use small whole cloves or slices of garlic
  •  Use thin sliced of lemon or lime cut to fit on

   Flavor Scenter® screen.
Using	Steaming	Baskets	(G)
This unit comes with 3 steaming baskets and a rice bowl and is designed...
Page 6
1096.
If no selection is made within 10 seconds the unit
will display OFF. Press 												   button and make
selection (L).
7.  Once food selection is made, press and hold
or
       button to change the time. There is a
90 minute timer on the appliance.
NOTE:	Press	and	hold	the	button	down	for	the
minutes	to	change	rapidly	or	press	and	release	for
time	to	change	at	one	minute	intervals.
  8.  If time is changed from the preset time the changed time will begin to flash;

    press...
Page 7
1211
Food	Amount	 Suggested		 Time		 	 Seasoning
	 RICE
White  1 cup rice with  salt, pepper,   30 minutes

  11⁄4 cups water butter, olive oil
  1
1⁄2 cups rice     40 minutes
  with 11⁄2 cups water
Brown  1 cup rice with  salt, pepper  50 minutes

  11⁄2 cups water butter, olive oil
FRESH	 VEGETABLES
Asparagus  8 oz. trimmed fresh  chervil or savory 10 to 12 minutes
Broccoli  1 bunch (about  basil or dill 8 to 10 minutes

  1 lb. fresh florets)
Cabbage    1 small head,  oregano   16 to 18 minutes...
Page 8
1413
Care	and 	Cleaning
This appliance contains no user-serviceable parts. Refer service to qualified service
personnel.
IMPORTANT: Unplug the unit and allow to cool completely before cleaning.
CLEANING
Steaming	 Baskets,	Rice	Bowl,	 Lid	and	 Drip	 Tray
Immerse in warm, sudsy water. Rinse and dry thoroughly. These parts can also be
washed in the dishwasher, top rack only.
Water	 Reservoir
• To empty the water reservoir, tilt the unit to the
right or left and let water flow out the water-fill
inlets...
Page 9
1615
ENCHUFE	POLARIZADO	 (Solamente	en	los	 modelos	 de	120V)
Este aparato cuenta con un enchufe polarizado (un contacto es más ancho que el
otro). A fin de reducir el riesgo de un choque eléctrico, este enchufe encaja en una
toma de corriente polarizada en un solo sentido.  Si el enchufe no entra en la toma de
corriente, inviértalo y si aun así no encaja, consulte con un electricista. Por favor no
trate de alterar esta medida de seguridad.
CABLE	 ÉLECTRICO
a)  El producto se debe de proporcionar...
Page 10
1817
El	producto 	puede 	variar 	ligeramente 	del 	que 	aparece 	ilustrado.
†	 1.	Tapa	 con	orificios	 de	escape	 de	vapor
	 	 (Pieza	 Nº		HS1300-01)
†	 2.	Recipiente	 de	5	tazas	 para	arroz
	 	 (Pieza	 Nº		HS1300-02)
†	 3.	Cesta	 superior	 para	vaporizar,
	 	 con	 huevera	incorporada
	 	 (Pieza	 Nº		HS1300-03)
†	 4.	Cesta	 intermedia	 para	vaporizar,
	 	 con	 huevera	incorporada
	 	 (Pieza	 N	HS1300-04)
†	 5.	Cesta	 inferior	 para	vaporizar,
	 	 con	 huevera	incorporada
	 	 (Pieza	 Nº...


