Honda 60 Hp Gc 190 Manual
Here you can view all the pages of manual Honda 60 Hp Gc 190 Manual. The Honda manuals for Engine are available online for free. You can easily download all the documents as PDF.
Page 1
1ENGLISH
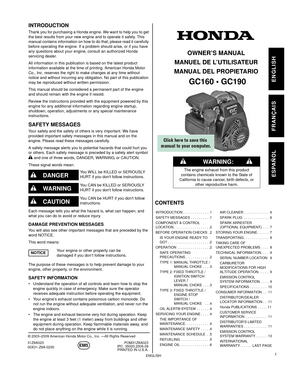
INTRODUCTION
Thank you for purchasing a Honda engine. We want to help you to get
the best results from your new engi ne and to operate it safely. This
manual contains information on how to  do that; please read it carefully
before operating the engin e. If a problem should arise, or if you have
any questions about your engine,  consult an authorized Honda
servicing dealer.
All information in this  publication is based  on the latest product
information available at the time  of printing....
Page 2
2ENGLISH
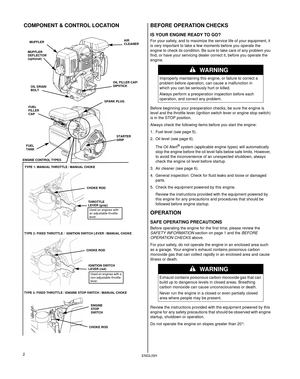
COMPONENT & CONTROL LOCATION BEFORE OPERATION CHECKS
IS YOUR ENGINE READY TO GO?
For your safety, and to maximize the service life of your equipment, it
is very important to take a fe w moments before you operate the
engine to check its condition. Be sure  to take care of any problem you
find, or have your servicing dealer  correct it, before you operate the
engine.
Before beginning your preoperation  checks, be sure the engine is
level and the throttle leve r (ignition switch lever or...
Page 3
3ENGLISH
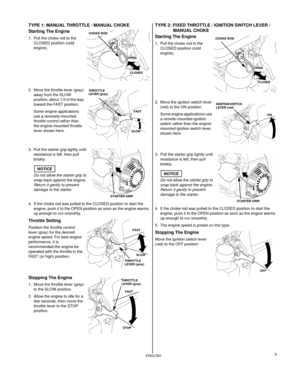
TYPE 1: MANUAL THROTTLE / MANUAL CHOKE
Starting The Engine
1. Pull the choke rod to the CLOSED position (cold
engine).
2. Move the throttle lever (gray)  away from the SLOW
position, about 1/3 of the way
toward the FAST position.
Some engine applications
use a remotely-mounted
throttle control rather than
the engine-mounted throttle
lever shown here.
3. Pull the starter  grip lightly until
resistance is felt, then pull
briskly.
NOTICE
Do not allow the starter grip to
snap back against...
Page 4
4ENGLISH
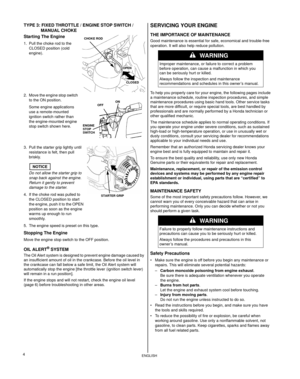
TYPE 3: FIXED THROTTLE / ENGINE STOP SWITCH /MANUAL CHOKE
Starting The Engine
1. Pull the choke rod to the  CLOSED position (cold
engine).
2. Move the engine stop switch  to the ON position.
Some engine applications
use a remote-mounted
ignition switch rather than
the engine-mounted engine
stop switch shown here.
3. Pull the starter  grip lightly until
resistance is felt, then pull
briskly.
NOTICE
Do not allow the starter grip to
snap back against the engine.
Return it gently to prevent...
Page 5
5ENGLISH
MAINTENANCE SCHEDULE
(1) Service more frequently when used in dusty areas.
(2) Change engine oil every 25 ho urs when used under heavy load
or in high ambient temperatures.
(3) These items should be serv iced by an authorized Honda
servicing dealer, unless you ha ve the proper tools and are
mechanically proficient. Refer  to the Honda shop manual for
service procedures.
(4) For commercial use, log hours  of operation to determine proper
maintenance intervals.
Failure to follow this...
Page 6
6ENGLISH
ENGINE OIL
Recommended Oil
Use 4-stroke motor oil that meets
or exceeds the requirements for
API service category SJ or later
(or equivalent). Always check the
API service label on the oil
container to be sure it includes
the letters SJ or later (or
equivalent).
SAE 10W-30 is recommended for  general use. Other viscosities
shown in the chart may be used wh en the average temperature in
your area is within the indicated range.
Oil Level Check
1. Check the oil with the  engine stopped...
Page 7
7ENGLISH
5. Install the spark plug carefully, by hand, to avoid cross-threading.
6. After the spark plug is seated, ti ghten with the proper size spark
plug wrench to compress the washer.
7. When installing a new spark plug,  tighten 1/2 turn after the spark
plug seats to compress the washer.
8. When reinstalling the original spar k plug, tighten 1/8 - 1/4 turn after
the spark plug seats to  compress the washer.
NOTICE
A loose spark plug can become  very hot and can damage the
engine. Overtightening...
Page 8
8ENGLISH
Draining The Fuel Tank And Carburetor
1. Use a siphon pump (commercially available) and siphon the fuel
out of the fuel tank into  an approved gasoline container.
2. Place an approved gasoline cont ainer below the carburetor, and
use a funnel to avoid spilling fuel.
3. Loosen the carburetor drain screw.  and drain the carburetor into an
approved gasoline container. Afte r draining is completed, tighten
the carburetor drain screw.
ENGINE OIL
1. Change the engine oil  (see page 6).
2....
Page 9
9ENGLISH
TECHNICAL INFORMATION
SERIAL NUMBER LOCATION
Record the engine serial
number in the space
below. You will need this
information when
ordering parts and when
making technical or
warranty inquiries.
Engine serial number: __ __ __ __ __ – __ __ __ __ __ __ __
Engine type: ___ ___ ___ ___
Date Purchased: ___ / ___ / ___
Radio Frequency Interference Label (Canada)
This engine complies with Canadi an radio frequency interference
regulations, ICES-002.
CARBURETOR MODIFICATIONS FOR HIGH...
Page 10
10ENGLISH
Air Index
An Air Index Information hang tag/label is applied to engines certified
to an emission durability time  period in accordance with the
requirements of the Califo rnia Air Resources Board.
The bar graph is intended to provide  you, our customer, the ability to
compare the emissions performance  of available engines. The lower
the Air Index, the less pollution.
The durability description is intend ed to provide you with information
relating the engine’s emission durabi lity period....


