Honeywell Rlv3120a1005h Manual
Here you can view all the pages of manual Honeywell Rlv3120a1005h Manual. The Honeywell manuals for Thermostat are available online for free. You can easily download all the documents as PDF.
Page 1
Application
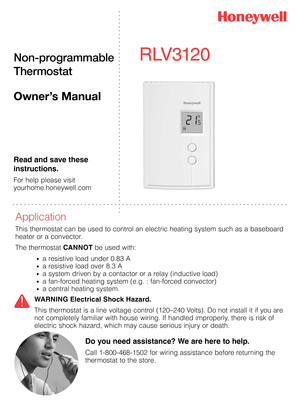
This thermostat can be used to control an electric heating system such as a baseboard heater or a convector.
The thermostat CANNOT be used with:
• a resistive load under 0.83 A• a resistive load over 8.3 A• a system driven by a contactor or a relay (inductive load)• a fan-forced heating system (e.g. : fan-forced convector)• a central heating system.
WARNING Electrical Shock Hazard.
This thermostat is a line voltage control (120–240 Volts). Do not install it if you are not completely familiar...
Page 2
2
ATTENTION: MERCURY RECYCLING NOTICE
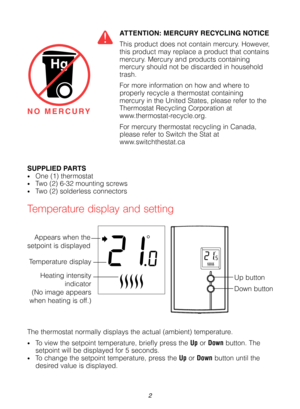
This product does not contain mercury. However, this product may replace a product that contains mercury. Mercury and products containing mercury should not be discarded in household trash.
For more information on how and where to properly recycle a thermostat containing mercury in the United States, please refer to the Thermostat Recycling Corporation at  www.thermostat-recycle.org.
For mercury thermostat recycling in Canada, please refer to Switch the Stat at...
Page 3
3
Removing the faceplate
WARNING
TURN OFF POWER TO THE
HEATING SYSTEM AT THE
MAIN POWER PANEL TO
AVOID ELECTRIC SHOCK.
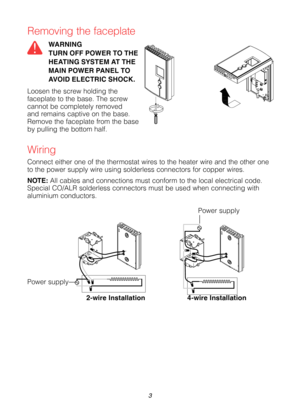
Loosen the screw holding the faceplate to the base. The screw cannot be completely removed and remains captive on the base. Remove the faceplate from the base by pulling the bottom half.
4-wire Installation2-wire Installation
Wiring
Connect either one of the thermostat wires to the heater wire and the other one to the power supply wire using solderless connectors for copper wires....
Page 4
4
Installing the faceplate
Install the base onto an electrical box.
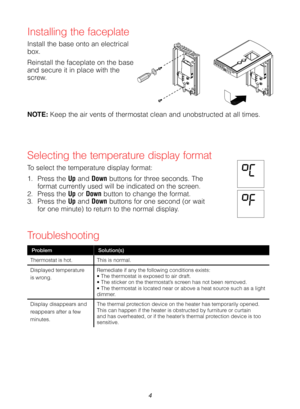
Reinstall the faceplate on the base and secure it in place with the screw.
Selecting the temperature display format
To select the temperature display format:
1. Press the Up and Down buttons for three seconds. The format currently used will be indicated on the screen.2. Press the Up or Down button to change the format.3. Press the Up and Down buttons for one second (or wait for one minute) to return to the normal display.
NOTE: Keep the...
Page 5
5
Specifications
Supply: 120/240 VAC, 60 Hz
Minimum load:  0.83 A (resistive only)
 200 W @ 240 V AC
 100 W @ 120 V AC
Maximum load:  8.3 A (resistive only)
  2000 W @ 240 VAC
 1000 W @ 120 VAC
Display range: 0 °C to 50 °C (32 °F to 99 °F)
Setpoint range: 5 °C to 30 °C (40 °F to 85 °F)
Storage: -20 °C to 50 °C (-4 °F to 120 °F)
Heating cycle length: 15 seconds
Permanent memory: You do not need to adjust the temperature following a power outage.
Page 6
1-year limited warranty
Honeywell warrants this product, excluding battery, to be free from defects in the workmanship or materials, under normal use and service, for a period of one (1) year from the date of purchase by the consumer. If at any time during the warranty period the product is determined to be defective or malfunctions, Honeywell shall repair or replace it (at Honeywell’s option).
If the product is defective,
(i) return it, with a bill of sale or other dated proof of purchase, to the place...
Page 7
Application
Ce thermostat a été conçu pour commander un appareil de chauffage électrique tel qu’une plinthe chauffante ou un convecteur.
Ce thermostat NE PEUT être utilisé avec :
• une charge résistive inférieure à 0,83 A• une charge résistive supérieure à 8,3 A• un appareil muni d’un contacteur ou d’un relais (charge inductive)• un appareil muni d’un ventilateur (exemple : ventiloconvecteur)• un système de chauffage central
MISE EN GARDE : Risque de chocs électriques.
Ne pas installer ce régulateur...
Page 8
8
ATTENTION: AVIS RELATIF AU RECYCLAGE DU MERCURE
Ce produit ne contient aucun mercure. Cependant, ce produit peut remplacer un produit qui contient du mercure. Le mercure et les produits contenant du mercure ne doivent pas être jetés aux ordures ménagères.
Pour obtenir plus d›informations pour savoir comment et où recycler adéquatement un thermostat contenant du mercure aux États-Unis, consultez l›organisme de recyclage des thermostats (Thermostat Recycling Corporation) à www.thermostat-recycle.org....
Page 9
9
Enlever la façade
AVERTISSEMENT
METTRE LE SYSTÈME
DE CHAUFFAGE HORS
TENSION AFIN D’ÉVITER
TOUT RISQUE DE CHOC
ÉLECTRIQUE.
Desserrer la vis qui retient la façade du thermostat à la base. La vis ne peut être complètement enlevée et reste captive sur la base. Séparer la façade de la base en tirant sur la partie inférieure du thermostat.
4-wire Installation2-wire Installation
Câblage
Relier n’importe quel fil du thermostat au fil de l’appareil de chauffage (charge) et l’autre fil au fil de...
Page 10
10
Installer la façade
Installer la base sur une boîte électrique.
Remettre la façade du thermostat sur la base et resserrer la vis.
Selectionner le format d’affichage de la température
Pour selectionner le format d’affichage de la température :
1. Appuyer sur les boutons Haut et Bas pendant trois secondes.  Le format utilisé sera indiqué à l’écran.2. Appuyer sur le bouton Haut ou Bas pour changer le format.3. Appuyer sur les boutons Haut et Bas pendant une seconde (ou attendre une minute) pour retourner...


