Home
>
Black and Decker
>
Iron
>
Black and Decker FIRST IMPRESSIONS CORD REEL IRON ICR500 User Manual
Black and Decker FIRST IMPRESSIONS CORD REEL IRON ICR500 User Manual
Here you can view all the pages of manual Black and Decker FIRST IMPRESSIONS CORD REEL IRON ICR500 User Manual. The Black and Decker manuals for Iron are available online for free. You can easily download all the documents as PDF.
Page 1
ModelS/ModeloS
❍	ICR500
❍	ICR505
❍	ICR510
❍	ICR515
❍	ICR517
❍	ICR520
fIRST IMPRESSIONS® CORD REEL IRON
PLANCHA CON CAbLE RETRACTAbLE
fIRST IMPRESSIONS®
For	online customer service
and	to
register 	your	product,	go	to
www.prodprotect.com/applica
CustomerCare Line:	USA/Canada	1-800-231-9786
Mexico
01-714-2500
Accessories/Parts (USA	/	Canada)
Accesorios/Partes (ee.UU	/	Canadá)
1-800-738-0245
Page 2
2
3

Please Read and Save this Use and Care book
IMPORTANT SAfEGUARDS
When	using	your	iron,	 basic	 safety	 precautions	 should	always	 be	followed,
including	 the	following:
❍	Read	 all	instructions	 before	using.
❍	Use	 iron	only	 for	its	intended	 use.
❍	To	 protect	 against	 a	risk	 of	electric	 shock,	do	not	 immerse	 the	iron	 in
water	 or	other	 liquid.
❍	The	 iron	should	 always	 be	turned	 off	[0]	(refer	 to	Ho W	T o	USe 	section)
before	 plugging	 into	or	unplugging	 from	an	outlet.	 Never...
Page 3
4
5

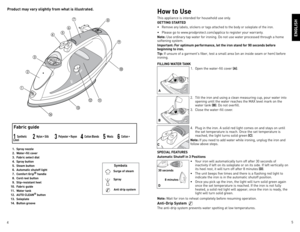
How to Use
This	appliance 	is 	intended 	for 	household 	use 	only.
GETTING STARTED
•	Remove	 any	labels,	 stickers	 or	tags	 attached	 to	the	 body	 or	soleplate	 of	the	 iron.
•	 Please 	go 	to 	www.prodprotect.com/applica 	to 	register 	your 	warranty.
Note: 	Use 	ordinary 	tap 	water 	for 	ironing. 	do	not 	use 	water 	processed 	through 	a 	home
softening 	system.
Important:  for optimum performance, let the iron stand for 90 seconds before
beginning to iron.
Tip: 	If 	unsure 	of 	a...
Page 4
6
7

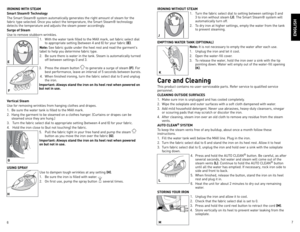
IRONING WITH STEAM
Smart Steam® Technology
The	Smart 	Steam® 	system 	automatically 	generates 	the 	right 	amount 	of 	steam 	for 	the
fabric 	type 	selected. 	once 	you 	select 	the 	temperature, 	the 	Smart 	Steam® 	technology
detects 	the 	temperature 	and 	adjusts 	the 	steam 	power 	accordingly.
Surge of Steam
Use 	to 	remove 	stubborn 	wrinkles.
1.	 With 	the 	water 	tank 	filled 	to 	the 	MAX 	mark, 	set 	fabric 	select 	dial
to 	appropriate 	setting 	(between 	4 	and 	6) 	for 	your...
Page 5
8
9

NEED HELP?
For	service,	repair	or	any	questions	regarding	your	appliance,	call	the	appropriate	800
number	on	cover	of	this	book.	Please
DO NOT	return	the	product	to	the	place	of	purchase.
Also,	please	DO NOT 	mail	product	back	to	manufacturer,	nor	bring	it	to	a	service	center.
You	may	also	want	to	consult	the	website	listed	on	the	cover	of	this	manual.
Two-Year Limited Warranty
(Applies only in the United States and Canada)
What does it cover?
•	 Any	defect	in	material	or	workmanship	provided;...
Page 6
10
11

Por favor lea este instructivo antes de usar el producto.
INSTRUCCIONES IMPORTANTES
DE SEGURIDAD
Siempre	que	utilice	 su	plancha,	 debe	seguir	 algunas	 precauciones	 básicas
de	 seguridad,	 incluyendo	 las	siguientes:
❍	lea	 todas	 las	instrucciones	 antes	de	utilizar	 el	producto.
❍	Use	 la	plancha	 únicamente	 para	planchar.
❍	No	 sumerja	 la	plancha	 en	agua	 ni	en	 ningún	 otro	líquido	 para	evitar
el	 riesgo	 de	un	 choque	 eléctrico.
❍	Siempre	 apague	[0]	la	plancha	 (vea	la	sección...
Page 7
12
13

Este producto puede variar ligeramente del que aparece ilustrado.Como usar
este	aparato	 es	para	 uso	doméstico	 solamente.
PASOS PRELIMINARES
•	Retire	toda 	etiqueta 	o 	calcomanía 	adherida 	al 	cuerpo 	o 	a 	la 	suela 	de 	la 	plancha.
•	 Por	 favor,	visite	www.prodprotect.com/applica	 para	registrar	 su	garantía.
Nota: 	Utilice	 agua	de	la	llave	 para	llenar	 el	tanque	 de	la	plancha.	 No	utilice	 agua
procesada	 por	un	ablandador	 de	agua	 doméstico.
Importante: Para óptimo rendimiento,...
Page 8
14
15

SISTEMA A PRUEbA DE GOTEO
el	 sistema	 a	prueba	 de	goteo	 evita	las	manchas	 de	agua	 que	puede	 ocasionar	 la	plancha
a	 temperaturas	 bajas.
PLANCHADO A VAPOR
Tecnología Smart Steam®
el	sistema	 Smart	Steam®	 produce	la	cantidad	 de	vapor	 apropiado	 automáticamente
según	 el	tipo	 de	tejido	 determinado.	 Una	vez	que	 uno	 ajusta	 la	temperatura,	 el	sistema
Smart	 Steam®	 detecta	la	temperatura	 y	ajusta	 la	emisión	 de	vapor	 respectivamente.
Emisión de vapor
Apropiado	 para	deshacer...
Page 9
16
17

ALMACENAMIENTO DE LA PLANCHA
1.	desconecte	 la	plancha	 y	espere	 que	se	enfríe.
2.	 Verifique	 que	el	selector	 de	temperatura	 esté	ajustado	 a	la
posición	 “0”.
3.	Presione	 y	sostenga	 el	botón	 de	cable	 retractable	(M).
4.	Coloque	 la	plancha	 verticalmente	 sobre	el	talón	 de	descanso
para	 evitar	 que	la	suela	 gotee.
ESPAÑOL
¿NECESITA AYUDA?
Para	servicio,	reparaciones	o	preguntas	relacionadas	al	producto,	por	favor	llame	al
número	del	centro	de	servicio	en	el	país	donde	usted	compró...
Page 10
18
19

Excepciones
esta	Garantía	no	será	válida	cuando	el	producto:
A)	 Se	hubiese	utilizado	en	condiciones	distintas	a	las	normales.
B)	 No	hubiese	sido	operado	de	acuerdo	con	el	instructivo	de	uso	que	le	acompaña.
C)	 Cuando	el	producto	hubiese	sido	alterado	o	reparado	por	personas	no	autorizadas

por	Applica	Manufacturing,		S.	de	R.	l.	de	C.V.
Nota: 	Usted	podra	encontrar	partes,	componentes,	consumibles	y	accesorios	en	los
centros	de	servicios	autorizados.	esta	garantía	incluyen	los	gastos	de...

![Page 2
2
3
Please Read and Save this Use and Care book
IMPORTANT SAfEGUARDS
When using your iron, basic safety precautions should always be followed,
including the following:
❍ Read all instructions before using.
❍ Use iron only for its intended use.
❍ To protect against a risk of electric shock, do not immerse the iron in
water or other liquid.
❍ The iron should always be turned off [0] (refer to Ho W T o USe section)
before plugging into or unplugging from an outlet. Never... Page 2
2
3
Please Read and Save this Use and Care book
IMPORTANT SAfEGUARDS
When using your iron, basic safety precautions should always be followed,
including the following:
❍ Read all instructions before using.
❍ Use iron only for its intended use.
❍ To protect against a risk of electric shock, do not immerse the iron in
water or other liquid.
❍ The iron should always be turned off [0] (refer to Ho W T o USe section)
before plugging into or unplugging from an outlet. Never...](http://img.usermanuals.tech/thumb/5454/40593/w300_first-impressions-cord-reel-iron-icr500-1482374642_d-1.png)


![Page 6
10
11
Por favor lea este instructivo antes de usar el producto.
INSTRUCCIONES IMPORTANTES
DE SEGURIDAD
Siempre que utilice su plancha, debe seguir algunas precauciones básicas
de seguridad, incluyendo las siguientes:
❍ lea todas las instrucciones antes de utilizar el producto.
❍ Use la plancha únicamente para planchar.
❍ No sumerja la plancha en agua ni en ningún otro líquido para evitar
el riesgo de un choque eléctrico.
❍ Siempre apague [0] la plancha (vea la sección... Page 6
10
11
Por favor lea este instructivo antes de usar el producto.
INSTRUCCIONES IMPORTANTES
DE SEGURIDAD
Siempre que utilice su plancha, debe seguir algunas precauciones básicas
de seguridad, incluyendo las siguientes:
❍ lea todas las instrucciones antes de utilizar el producto.
❍ Use la plancha únicamente para planchar.
❍ No sumerja la plancha en agua ni en ningún otro líquido para evitar
el riesgo de un choque eléctrico.
❍ Siempre apague [0] la plancha (vea la sección...](http://img.usermanuals.tech/thumb/5454/40593/w300_first-impressions-cord-reel-iron-icr500-1482374642_d-5.png)


