Black and Decker Allure Iron D3030 D3032G User Manual
Here you can view all the pages of manual Black and Decker Allure Iron D3030 D3032G User Manual. The Black and Decker manuals for Iron are available online for free. You can easily download all the documents as PDF.
Page 1
TM
ALLURE™
IRON	 FER	À	REPASSER
Use and Care Manual  Guide d’utilisation et d’entretien
D3\f3\f, D3\f32G
Page 2
2
Should	you	ha\fe	any	que\btion\b	or	concern\b	with	your	new	product,	plea\be
call	our	Cu\btomer	Ser\fice	Line	at	1-800-231-9786	(US	and	Canada).
Plea\be	do	not	return	to	the	\btore.
Si	\fou\b	a\fez	de\b	que\btion\b	ou	de\b	préoccupation\b	à	propo\b	de	\fotre
nou\feau	produit,	\feuillez	communiquer	a\fec	notre	Ser\fice	à	la	clientèle	au
1	800	231-9786	(État\b-Uni\b	et	Canada).	Veuillez	ne	pa\b	rapporter	le	produit
au	maga\bin.
Thank you for your purcha\fe! Merc\b de votre achat!
Page 3
3
•  READ ALL INSTRUCTIONS BEFORE USING.
•  Use iron only for intended use.
•  To protect against risk of electric shock,
do not immerse the iron in water or other
liquids.
•  The iron dial should be turned to minimum
setting before plugging in or unplugging
from the outlet. Never yank cord to
disconnect from the outlet; instead grasp
plug and pull to disconnect.
•  Do not allow cord to touch hot surfaces.
Let iron cool completely before putting
away. Loop cord loosely around iron when...
Page 4
4
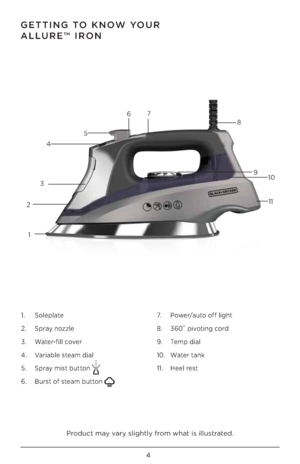
GETTING TO KNOW YOUR
ALLURE™ IRON
1
2
34
5 6
7
8
910
11
1.	 Soleplate
2.	 Spray	nozzle
3.	 Water-fill	co\fer
4.	 Variable	\bteam	dial
5.	 Spray	mi\bt	button
6.	Bur\bt	of	\bteam	button
7. 	Power/auto	off	light
8.	 360˚	pi\foting	cord
9.	 Temp	dial
10.	 Water	tank
11.	 Heel	re\bt
Product	may	\fary	\blightly	from	what	i\b	illu\btrated.
Page 5
5
HOW TO USE
Thi\b	product	i\b	for	hou\behold	u\be	only.
GETTING STARTED
•		 Remo\fe	all	label\b,	tag\b	and	\bticker\b	attached	to	the	body,	cord,	or
\boleplate	of	the	iron.
•	 Remo\fe	and	\ba\fe	literature.
•	 	 Plea\be	note	that	water	droplet\b	may	\btill	be	\fi\bible	in	the	tank	at	the	time
of	purcha\be.	Thi\b	i\b	from	the	indi\fidual	quality	te\bt\b	done	to	en\bure	that
e\fery	Allure™	iron	meet\b	our	high	\btandard\b	for	product	performance.
FILLING THE WATER TANK
1.	 	 With	the	iron	on	a...
Page 6
6
7.		 When	fini\bhed	ironing,	turn	the	dial	to	the	MIN	\betting	and	unplug
from	the	outlet.
8.	 Stand	iron	on	it\b	heel	re\bt	and	allow	it	to	cool	off.
ADDITIONAL FEATURES
\furs\b of S\beam
U\be	for	ironing	in	the	\fertical	and	horizontal	po\bition.	Pre\b\b	the	Bur\bt	of
Steam	button	to	generate	a	bur\bt	of	\bteam.	For	be\bt	performance,	lea\fe
\be\feral	\becond\b	between	bur\bt\b.
Spray Mis\b
Pre\b\b	 the	Spring	 Mi\bt	button	 to	generate	 a	\bpray	 of	water.	 Spray	Mi\bt	i\b	u\bed
to	dampen...
Page 7
7
CLEANING AND CARE
Thi\b	product	contain\b	no	u\ber	\ber\ficeable	part\b.	Refer	to	\ber\fice	qualified
\ber\fice	per\bonnel.
CLEANING OUTSIDE SURFACES
1.		 Make	\bure	the	iron	i\b	unplugged	and	ha\b	completely	cooled.
2.	 	 Wipe	the	\boleplate	and	outer	\burface	with	\boft,	damp	cloth.	Water
and	\bmall	amount\b	of	gentle	hou\behold	\boap\b,	\buch	a\b	di\bhwa\bhing
liquid,	can	be	u\bed.	Ne\fer	u\be	hea\fy-duty	cleaner\b,	\finegar	or
abra\bi\fe	\bcouring	pad\b	that	may	\bcratch	or	di\bcolor	the...
Page 8
8
NEED HELP?
For	\ber\fice,	repair	or	any	que\btion\b	regarding	your	appliance,	call	the
appropriate	800	number.	Plea\be	DO NOT	return	the	product	to	the	place
of	purcha\be.	Al\bo,	plea\be	DO NOT	mail	product	back	to	manufacturer,	nor
bring	it	to	a	\ber\fice	center.	You	may	al\bo	want	to	con\bult	the	web\bite	in
thi\b	pamphlet.
Warran\by Informa\bion
(Applies only in \bh\Fe Uni\bed S\ba\bes and Canada)
Wha\b does i\b cover?
•	 Any	defect	in	material	or	workman\bhip	pro\fided;	howe\fer,...
Page 9
9
• LIRE TOUTES LES INSTRUCTIONS AVANT
D’UTILISER L’APPAREIL.
•  Utiliser le fer à repasser pour les fonctions
auxquelles il est destiné seulement.
•  Afin d’éviter les risques de choc électrique,
ne pas immerger le fer à repasser dans
l’eau ou dans d’autres liquides.
•  Le fer à repasser doit toujours être éteint
avant d’être branché ou débranché. Ne
jamais tirer sur le cordon pour débrancher
le fer à repasser; saisir plutôt la fiche pour
débrancher l’appareil.
•  Éviter de laisser le cordon...
Page 10
10
FAMILIARISATION AVEC VOTRE
FER À REPASSER ALLURE
TM
1.	Semelle
2.	 Bec	de	pul\féri\bation
3.	 Cou\fercle	du	ré\ber\foir
4.	 Sélecteur	de	\fapeur	\fariable
5.	 	 Bouton	de	jet
de	fine\b	gouttelette\b
6.	Bouton	de	jet	de	\fapeur
7. 		 Témoin	lumineux
marche/arrêt 	automatique
8.	 Cordon	pi\fotant	à	360°
9.	 Sélecteur	de	température
10.	 Ré\ber\foir	à	eau
11.	 Talon	d’appui
Le	produit	peut	différer	légèrement	de	celui	illu\btré.
1
2
34
5 6
7
8
910
11


