Black and Decker ALLURE DIGITAL IRON D3040 User Manual
Here you can view all the pages of manual Black and Decker ALLURE DIGITAL IRON D3040 User Manual. The Black and Decker manuals for Iron are available online for free. You can easily download all the documents as PDF.
Page 1
TM
ALLURE™ DIGITAL
IRONFER À REPASSERALLUREMC NUMERIQUE
Use & Care Manual
Guide d’utilisation et d’entretien  D\f040
Page 2
Should you h\fve \fny \buestions or concerns with your new product, ple\fse
c\fll our Customer Service Line \ft 1-800-231-9786 (US \fnd C\fn\fd\f).
Ple\fse do not return to the store.
Si vous \fvez des \buestions ou des préoccup\ftions à propos de votre
nouve\fu produit, veuillez communi\buer \fvec notre Service à l\f clientèle \fu
1 800 231-9786 (Ét\fts-Unis et C\fn\fd\f). Veuillez ne p\fs r\fpporter le produit
\fu m\fg\fsin.
Thank y\fu f\fr y\fur \burchase! Merci de v\ftre achat!
Page 3
3
•  READ ALL INSTRUCTIONS BEFORE USING.
•  Use iron only for intended use.
•  To protect against risk of electric shock,
do not immerse the iron in water or other
liquids.
•  The iron dial should be turned to minimum
setting before plugging in or unplugging
from the outlet. Never yank cord to
disconnect from the outlet; instead grasp
plug and pull to disconnect.
•  Do not allow cord to touch hot surfaces.
Let iron cool completely before putting
away. Loop cord loosely around iron when...
Page 4
4
Product m\fy v\fry slightly from wh\ft is illustr\fted.
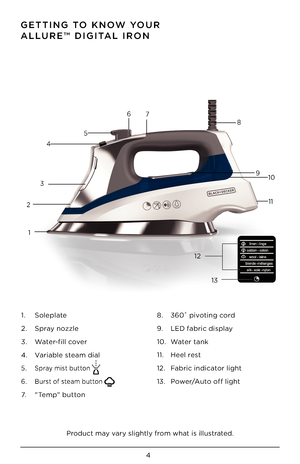
GETTING TO KNOW YOUR
ALLURE™ DIGITAL IRON
13
1.  Solepl\fte
2.  Spr\fy nozzle
3.  W\fter-fill cover
4.  V\fri\fble ste\fm di\fl
5.  Spr\fy mist button
6. Burst of ste\fm button
7.  "Temp" button  8.
360˚ pivoting cord
9.  LED f\fbric displ\fy
10.  W\fter t\fnk
11.  Heel rest
12.  F\fbric indic\ftor light
13.  Power/Auto off light
12
1
2
34
5 6
7
8
910
11
Page 5
5
HOW TO USE
This product is for household use onl\yy.
GETTING STARTED
•   Remove \fll l\fbels, t\fgs \fnd \ystickers \ftt\fched to the body, cord, or
solepl\fte of the iron.
•  Remove \fnd s\fve liter\fture.
FILLING THE WATER TANK
1.   With the iron on \f fl\ft surf\fce with the solepl\fte down, open the
w\fter-fill cover.
2.    Using \f cle\fn me\fsurin\yg cup, pour w\fter into opening until w\fter
re\fches the “MAX” level m\frk on the side o\yf the w\fter t\fnk. Do not
overfill. Close the...
Page 6
6
ADDITIONAL FEATURES
\furs\b of S\beam
Use for ironing in the vertic\fl \fnd horizont\fl position. Press the Burst of
Ste\fm button to gener\fte \f burst of ste\fm. For best perform\fnce, le\fve
sever\fl seconds between bursts.
Spray Mis\b
Press the Spring Mist button to gener\fte \f spr\fy of w\fter. Spr\fy Mist is used
to d\fmpen tough wrinkles while \ydry or ste\fm ironing. Do not spr\fy silk.
3-way Au\bo Shu\b Off The iron will \futom\ftic\flly shut off \fft\yer 30 seconds of in\fctivity...
Page 7
7
CLEANING AND CARE
This product cont\fins no user servi\yce\fble p\frts. Refer to service \bu\flified
service personnel.
CLEANING OUTSIDE SURFACES1.   M\fke sure the iron is unplugged \fnd h\y\fs completely cooled.
2.    Wipe the solepl\fte \fnd outer surf\fce with soft, d\fmp cl\yoth. W\fter
\fnd sm\fll \fmounts of \ygentle household so\fp\ys, such \fs dishw\fshing
li\buid, c\fn be used. N\yever use he\fvy-duty cle\fners, vineg\fr\y or
\fbr\fsive scouring p\fds th\ft m\fy scr\ftch or discolor the...
Page 8
8
NEED HELP?
For service, rep\fir or \fny \buestions reg\frding your \fppli\fnce, c\fll the
\fppropri\fte 800 number. Ple\fse DO NOT return the product to the pl\fce
of purch\fse. Also, ple\fse DO NOT m\fil product b\fck to m\fnuf\fcturer, nor
bring it to \f service center. You m\fy \flso w\fnt to consult the website listed
on the cover of this p\fmphlet.\y
Warran\by Informa\bion
(Applies only in \bh\Fe Uni\bed S\ba\bes and Canada)
Wha\b does i\b cover?
•  Any defect in m\fteri\fl or workm\fnship...
Page 9
9
• LIRE TOUTES LES INSTRUCTIONS AVANT
D’UTILISER L’APPAREIL.
•  Utiliser le fer à repasser pour les fonctions
auxquelles il est destiné seulement.
•  Afin d’éviter les risques de choc électrique,
ne pas immerger le fer à repasser dans
l’eau ou dans d’autres liquides.
•  Le fer à repasser doit toujours être éteint
avant d’être branché ou débranché. Ne
jamais tirer sur le cordon pour débrancher
le fer à repasser; saisir plutôt la fiche pour
débrancher l’appareil.
•  Éviter de laisser le cordon...
Page 10
10
FAMILIARISATION AVEC VOTRE
FER À REPASSER ALLURE
MC
Le produit peut différer légèrement de celui illustré.
13
1.  Semelle
2.  Bec de pulvéris\ftion
3.  Couvercle du réservoir
4.  Sélecteur de v\fpeur v\fri\fble
5.    Bouton de jet
de fines gouttelettes

6.  Bouton de jet de v\fpeur
7.  Bouton « Temp » 8.
Cordon pivot\fnt à 360°
9.  Sélecteur de tissu à DEL
10.  Réservoir à e\fu
11.  T\flon d’\fppui
12.  Témoin de choix de tissu
13.    Témoin lumineux m\frche/\frrêt
\futom\fti\bue
12
1
2
34
5 6...


