Home
>
Black and Decker
>
Coffeemaker
>
Black and Decker 12CUP PROGRAMMABLE COFFEEMAKER DCM3100B User Manual
Black and Decker 12CUP PROGRAMMABLE COFFEEMAKER DCM3100B User Manual
Here you can view all the pages of manual Black and Decker 12CUP PROGRAMMABLE COFFEEMAKER DCM3100B User Manual. The Black and Decker manuals for Coffeemaker are available online for free. You can easily download all the documents as PDF.
Page 1
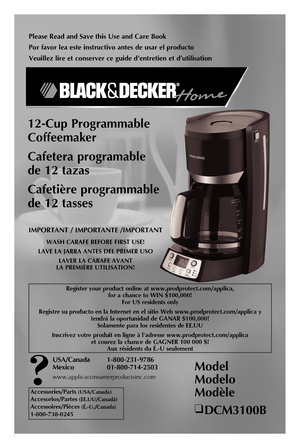
Please Read and Save this Use and Care Book
Por favor lea este instructivo antes de usar el producto
Veuillez lire et conserver ce guide d’entretien et d’utilisation
Model
Modelo
Modèle
❑ DCM3100B
12-Cup Programmable
Coffeemaker
Cafetera programable
de 12 tazas
Cafetière programmable
de 12 tasses
USA/Canada  1-800-231-9786
Mexico   01-800-714-2503
www.applicaconsumerproductsinc.com
IMPORTANT / IMPORTANTE /IMPORTANT
WASH CARAFE BEFORE FIRST USE!
LAVE LA JARRA ANTES DEL PRIMER USO
LAVER LA CARAFE...
Page 2
21
IMPORTANT SAFEGUARDS
When using electrical appliances, basic safety precautions should always be
followed to reduce the risk of fire, electric shock and/or injury to persons,
including the following:
❑ Read all instructions.
❑ Do not touch hot surfaces. Use handle or knobs.
❑ To protect against electric shock, do not place cord, plug or appliance in
water or other liquids.
❑ Close supervision is necessary when any appliance is used by or near
children.
❑ Unplug from outlet when not in use and...
Page 3
43
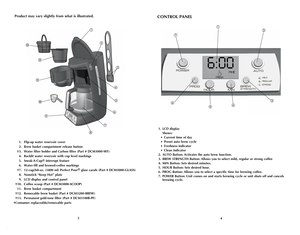
Product may vary slightly from what is illustrated.
 1.  LCD display
    Shows:
 • Current time of day
  • Preset auto brew cycle
  • Freshness indicator
  • Clean indicator
 2. AUTO Button: Activates the auto brew function.
 3. BREW STRENGTH Button: Allows you to select mild, regular or strong coffee
 4. MIN Button: Sets desired minutes.
 5. HOUR Button: Sets desired hour.
 6. PROG Button: Allows you to select a specific time for brewing coffee.
 7. POWER Button: Unit comes on and starts brewing...
Page 4
65
How to Use
This product is for household use only.
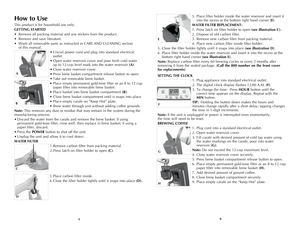
GETTING STARTED
• Remove all packing material and any stickers from the product.
• Remove and save literature.
• Wash all removable parts as instructed in CARe  AnD CLeAnIng section
of this manual.
• Uncoil power cord and plug into standard electrical
outlet.
• Open water reservoir cover and pour fresh cold water
up to 12-cup level mark into the water reservoir (A).
• Close water reservoir cover.
• Press brew basket compartment release button...
Page 5
10. Select the brew strength desired by pressing the BREW
STRENGTH button and selecting one of the 3 levels
desired (J):
 • MILD
 • REGULAR
  • STRONG
Note:  The BREW STRENGTH can be selected before or
after brewing begins.
11.  Press the POWER button and brewing begins.
Note:  To delay brewing see, DELAyED BREWING section.
 12.  Once the brewing cycle is complete the word FRESH
    and the FRESH icon will appear on the digital
   display (K).
 13.  After 20 minutes the digital display will...
Page 6
109
TREAT CARAFE WITH CARE
A damaged carafe may result in possible burns from a hot liquid. To avoid
breaking:
• Do not allow all liquid to evaporate from the carafe while on the "Keep Hot"
plate or heat the carafe when empty.
• Discard the carafe if damaged in any manner. A chip or crack could result in
breakage.
•  never use abrasive scouring pads or cleansers, they will scratch and weaken the
glass.
• Do not place the carafe on or near a hot gas or electric burner, in a heated oven
or in...
Page 7
1211
8. Refill the reservoir with cold water to the 12-cup line, replace the empty
carafe, put permanent gold-tone filter or a paper filter in the brew basket,
then turn on the coffeemaker and run another brew cycle to flush out the
remaining cleaning solution.
9. Wash the brew basket and carafe and carafe lid as instructed in CARe AnD
CLeAnIng.
10. Put the water filter holder with the carbon filter inside the water reservoir
andinsert it into the recess at the bottom right hand corner (see...
Page 8
1314
GUARDE ESTAS INSTRUCCIONES.
Este aparato eléctrico es para uso doméstico únicamente.
ENCHUFE POLARIZADO (Solamente para los modelos de 120V)
este aparato cuenta con un enchufe polarizado (un contacto es más ancho que el otro).
A fin de reducir el riesgo de un choque eléctrico, este enchufe encaja en una toma de
corriente polarizada en un solo sentido. Si el enchufe no entra en la toma de corriente,
inviértalo y si aun así no encaja, consulte con un electricista. Por favor no trate de
alterar...
Page 9
1516
 1.  Tapa articulada del tanque de agua
 2.  Botón para desenganchar el compartimiento del cesto de colar
 †3.  Porta filtro de agua  y filtro de carbón     (Pieza Nº  DCM3000-WF)
 4.  Tanque de agua iluminado, con marcas de las tazas
 5.  Dispositivo de interrupción de colado Sneak-A-Cup®
 6.  Marcas indicadoras de llenado de agua y del café colado
 †7.  Jarra Perfect Pour® de vidrio, de 1800 ml (12 tazas/60 oz)     (Pieza Nº DCM3000-GLASS)
 8.  Placa antiadherente de calentamiento
 9.  Pantalla...
Page 10
1718
Como usar
este aparato es para uso doméstico solamente
PASOS PRELIMINARES
• Retire todo material de empaque y calcomanía adherida al producto.
• Retire y conserve el manual de uso y cuidado.
• Lave todas las piezas removibles según las instrucciones en la sección de
CUIDADO y LIMPIezA de este manual.
• Desenrolle y enchufe el cable a una toma de corriente normal.
• Vierta agua fría en el tanque de agua hasta el nivel que
indica 12 tazas (A).
• Cierre la tapa del tanque de agua.
• Para abrir...


