Home
>
Addonics Technologies
>
Multi-Bay Enclosure
>
Addonics Technologies Storage Rack Rackmount Chassis SR46S4R5HM user guide
Addonics Technologies Storage Rack Rackmount Chassis SR46S4R5HM user guide
Here you can view all the pages of manual Addonics Technologies Storage Rack Rackmount Chassis SR46S4R5HM user guide. The Addonics Technologies manuals for Multi-Bay Enclosure are available online for free. You can easily download all the documents as PDF.
Page 1
Technical Support
If you need any assistance to get your unit functioning properly, please have your
product information ready and contact Addonics Technical Support at:
Hours: 8:30 am - 6:00 pm PST
Phone: 408-453-6212
Email: http://www.addonics.com/support/query/
v8.1.11
T E C H N O L O G I E S
www.addonics.com
User Guide
Storage Rack
(SR46S4R5HM)
Page 2
www.addonics.comTechnical Support (M-F 8:30am - 6:00pm PST)    Phone: 408-453-6212  Email: www.addonics.com/support/query/
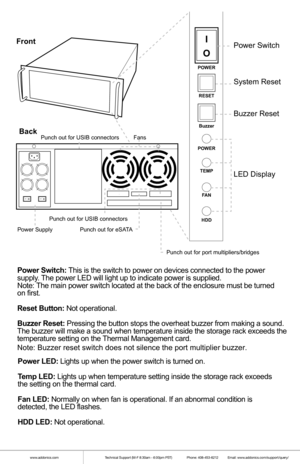
POWER
RESET
Buzzer
POWER TEMP
F AN
HDD
I
OPower Switch
System Reset
Buzzer Reset
LED Display
I
OI
O
Punch out for port multipliers/bridges
FansPunch out for USIB connectors
Front
Back
Power Switch : T his  is the  swit ch to power  on devic es connect ed to the  power
supply . T he  power  LE D  will  light  up to indicat e power  is supplied.
Not e: T he  main  power s witch  locat...
Page 3
www.addonics.comTechnical Support (M-F 8:30am - 6:00pm PST)    Phone: 408-453-6212  Email: www.addonics.com/support/query/
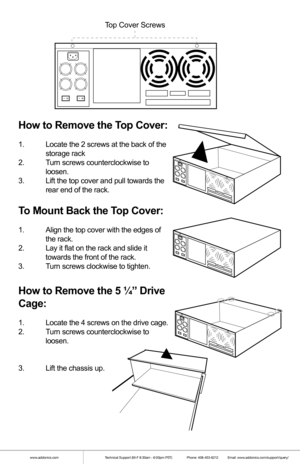
How  to  Remo ve th e T op  Cover:
1.  Locate the  2 screws  at the  back  of the
  storage  rack
2 .  Turn  screws  counterclockwise t o
  loosen.
3 .  Lift the t op cover  and pull t owards t he
  rear end of the  rack.
To  Mount  Back  th e T op  Cover:
1.  Align t he top cover  with the  edges  of
  the  rack.
2 .  Lay it flat  on the rack  and slide  it
  towards...
Page 4
www.addonics.comTechnical Support (M-F 8:30am - 6:00pm PST)    Phone: 408-453-6212  Email: www.addonics.com/support/query/
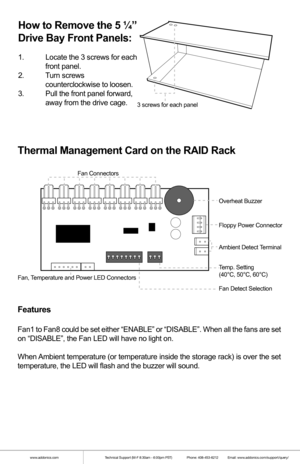
How  to  Remo ve th e 5  ¼ ”
Dri ve  Bay F ront  Pan els :
1.  Locate the  3 screws f or each
  front  panel.
2 .  Turn  screws
  counterclock wise to loosen.
3 .  Pull t he f ront  panel f orward,
  away from the drive c age.
3 s c rews f or each  panel
Thermal  Manag emen t Card on t he RAI D Rack
F eatu res
Fan1  to  F an8  could  be set eit her  “E N ABL E” or...
Page 5
www.addonics.comTechnical Support (M-F 8:30am - 6:00pm PST)    Phone: 408-453-6212  Email: www.addonics.com/support/query/
4x1 Hardware Port Multiplier (AD4SR5HPMU-E)


LE D p in s P in  1
SAT A
P ort  2 SAT A Port  3
SAT A
P ort  1
SAT A Port  4
US B p ort  conn ecti on
to  a ny USB c on tr olle r RA ID  co nfig  r o ta ry  s witc h
RA ID  se ttin g b utt o n  eSAT A P ort
P M  He alth  LED
e SAT A L ED
US B L ED
US B 5 -P in  He ade r P in...
Page 6
www.addonics.comTechnical Support (M-F 8:30am - 6:00pm PST)    Phone: 408-453-6212  Email: www.addonics.com/support/query/
Setting RAID on the HPM
1. Attach the SATA hard drives (up to 4) to the SATA ports on the Hardware
    Port Multiplier (HPM) using SATA cables. It is recommended to connect
    drives to the SATA ports 1 to 4 successively.
2. Set the Rotary switch to the RAID mode required.
3. Push the RAID setting button with a ballpoint pen tip while the HPM i\
s turned
   off.
4. While holding...
Page 7
www.addonics.comTechnical Support (M-F 8:30am - 6:00pm PST)    Phone: 408-453-6212  Email: www.addonics.com/support/query/
Installing th e 4th  Disk  Array on t he S to rag e Rack
a .  Remove t he back  panel  of the  storage  rack by loosening t he 4 screws
  indicated below .
b .  Secure t he bottom  bracket  of the
  storage  rack to the  disk  array  using
  screws.
c .  Secure t he top bracket  of the
  storage  rack to the  disk  array  using
  screws.
I
OI
O
S crews
R
d.  Slide t...
Page 8
www.addonics.comTechnical Support (M-F 8:30am - 6:00pm PST)    Phone: 408-453-6212  Email: www.addonics.com/support/query/
e.  Secure t he Disk  array
  by screwing t he top
  and bottom  brackets
  to  the f rame  of the
  storage rack.
I
OI
OR
S crews
S
crews
Installing St orag e Devi ces on t he S to rag e Rack

A
. 3 .5” h ard dr iv e
1 .   Attach  the  3.5”  to   5.25”
mount ing brackets  onto  bot h
sides  of t he  3.5”  SATA  or  ID E hard
drive  using t he included  sc rews .

2...
Page 9
www.addonics.comTechnical Support (M-F 8:30am - 6:00pm PST)    Phone: 408-453-6212  Email: www.addonics.com/support/query/
B.  5 .25” S to rag e d evi ces
1 .  S eparat e the  vent ilation  front
panel  and the  metal base  by
removing  the  two  flat -head
screws.
2 .  Attach  the  met al base  onto t he  opt ical  drive  or other  5.25”  storage  device  using
t he f lat head  screws f rom the vent ilation f ront  panel.

Opt ical  Drive
A ddonics  Drive  Cradle
Page 10
www.addonics.comTechnical Support (M-F 8:30am - 6:00pm PST)    Phone: 408-453-6212  Email: www.addonics.com/support/query/
C. 3 .5”  Mobile  Rack
1 .   S eparat e the  vent ilation  front  panel
and  the  met al base  by remov ing the  two
f lat -head  screws.
2 .  Attach  the  3.5”  drive  cradle  onto
t he  3.5”  to   5.25”  drive  bay mount ing
bracket  at  the  six  aligned  screw hole
locat ions.

3 .  Attach  the  met al base  onto the
opt ical  drive  or other  5.25”  storage  device
using...


