Sony Camera Alpha 6000 Instruction Manual
Here you can view all the pages of manual Sony Camera Alpha 6000 Instruction Manual. The Sony manuals for Digital Camera are available online for free. You can easily download all the documents as PDF.
Page 2
GB
2
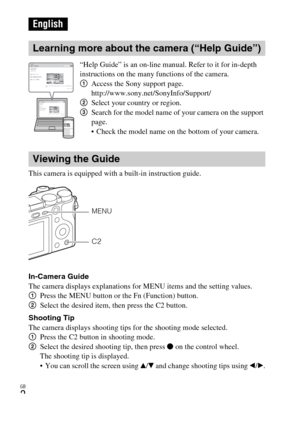
This camera is equipped with a built-in instruction guide.
In-Camera Guide
The camera displays explanations for MENU items and the setting values.
1Press the MENU button or the Fn (Function) button.
2 Select the desired item, then press the C2 button.
Shooting Tip
The camera displays shooting tips for the shooting mode selected.
1 Press the C2 button in shooting mode.
2 Select the desired shooting tip, then press  z on the control wheel.
The shooting tip is displayed.
• You can scroll the screen...
Page 3
GB
3
Owner’s RecordThe model and serial numbers are located on the bottom. Record the serial number in the
space provided below. Refer to these numbers whenever you call your Sony dealer
regarding this product.
Model No. ILCE-6000
Serial No.  _____________________________
Model No. AC-UB10C/AC-UB10D
Serial No.  _____________________________
To reduce fire or shock hazard, do not expose the unit to rain or
moisture.
IMPORTANT SAFETY INSTRUCTIONS
-SAVE THESE INSTRUCTIONS
DANGER
TO REDUCE THE RISK OF...
Page 4
GB
4
 Keep the battery pack out of the reach of small children.
 Keep the battery pack dry.
 Replace only with the same or equivalent type recommended by Sony.
 Dispose of used battery packs promptly as described in the instructions.
[AC AdaptorUse the nearby wall outlet (wall socket) when using the AC Adaptor. Disconnect the AC
Adaptor from the wall outlet (wall socket) immediately if any malfunction occurs while
using the apparatus.
The power cord (mains lead), if supplied, is designed specifically...
Page 5
GB
5
If you have any questions about this product, you may call:Sony Customer Information Center
1-800-222-SONY (7669)
The number below is for the FCC related matters only.
[ Regulatory Information
This equipment must not be co-located or operated in conjunction with any other antenna
or transmitter.
[CAUTIONYou are cautioned that any changes or modifications not expressly approved in this manual
could void your authority to operate this equipment.
[Note:This equipment has been tested and found to...
Page 6
GB
6
This device complies with Industry Canada licence-exempt RSS standard(s).
Operation is subject to the following two conditions: (1) this device may not cause
interference, and (2) this device must accept any interference, including interference that
may cause undesired operation of the device.
[Notice for the customers in the countries applying EU DirectivesManufacturer: Sony Corporation, 1-7-1 Konan Minato-ku Tokyo, 108-0075 Japan
For EU product compliance: Sony Deutschland GmbH, Hedelfinger...
Page 7
GB
7
[Disposal of waste batteries and electrical and electronic
equipment (applicable in the European Union and other
European countries with separate collection systems)
This symbol on the product, the battery or on the packaging indicates that
the product and the battery shall not be treated as household waste. On
certain batteries this symbol might be used in combination with a
chemical symbol. The chemical symbols for mercury (Hg) or lead (Pb) are
added if the battery contains more than...
Page 8
GB
8
Table of contents
– Checking the supplied items
– Identifying parts
– Inserting the battery pack
– Charging the battery pack
– Inserting a memory card (sold separately)
– Attaching/removing the lens
– Setting the clock
– Shooting still images/movies
– Viewing images
– Introduction of other functions
– Features of PlayMemories Home™
– Adding functions to the camera
– Number of still images and recordable time of movies
– Notes on using the camera
– Specifications
Preparing the cameraStep 1 P. 9...
Page 9
GB
9
First check the model name of your camera (page 8). The accessories supplied
differ depending on the model.
The number in parentheses indicates the quantity.
xSupplied with all models
 Camera (1)
 Power cord (mains lead) (1)* (not supplied in the U.S.A. and Canada)
* Multiple power cords may be  supplied with your camera. Use the
appropriate one th at matches your
country/region.
 Rechargeable battery pack
NP-FW50 (1)
 Micro USB cable (1)
 AC adaptor AC-UB10C/UB10D  (1)
 Shoulder strap (1)...
Page 10
GB
10
When the lens is removed
AShutter button
B C1 (Custom 1) button
C Remote sensor
D ON/OFF (Power) switch
E Self-timer lamp/AF illuminator
F Lens release button
G Microphone
1)
HLens
I Mount
J Image sensor
2)
KLens contacts2)
1)Do not cover this part during movie
recording.
2)Do not touch this part directly.
Identifying parts


