Home
>
Land Rover
>
Automobile
>
Land Rover Range Rover 2004my Owners Handbook Lm 2nd Edition Nas Rover
Land Rover Range Rover 2004my Owners Handbook Lm 2nd Edition Nas Rover
Here you can view all the pages of manual Land Rover Range Rover 2004my Owners Handbook Lm 2nd Edition Nas Rover. The Land Rover manuals for Automobile are available online for free. You can easily download all the documents as PDF.
Page 11
Quick Overview
10
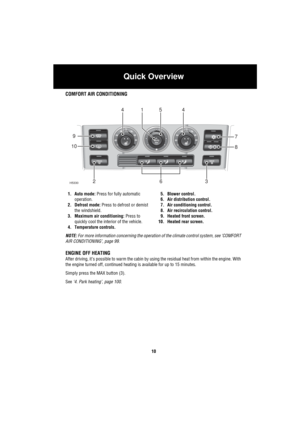
COMFORT AIR CONDITIONING
1. Auto mode: Press for fully automatic
operation.
2. Defrost mode: Press to defrost or demist
the windshield.
3. Maximum air conditioning: Press to
quickly cool the interior of the vehicle.
4. Temperature controls. 5. Blower control.
6. Air distribution control.
7. Air conditioning control.
8. Air recirculation control.
9. Heated front screen.
10. Heated rear screen.
NOTE: For more information concerning the operation of the climate control system, see...
Page 12
Quick Overview
11
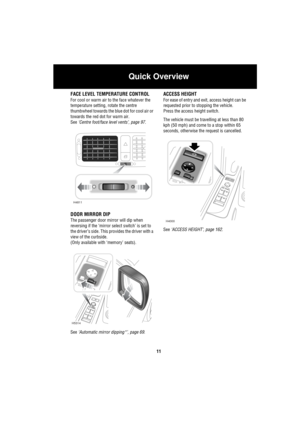
FACE LEVEL TEMPERATURE CONTROL
For cool or warm air to the face whatever the
temperature setting, rotate the centre
thumbwheel towards the blue dot for cool air or
towards the red dot for warm air.
See ‘Centre foot/face level vents’, page 97.
DOOR MIRROR DIP
The passenger door mirror will dip when
reversing if the ‘mirror select switch’ is set to
the driver’s side. This provides the driver with a
view of the curbside.
(Only available with ‘memory’ seats).
See ‘Automatic mirror...
Page 13
Quick Overview
12
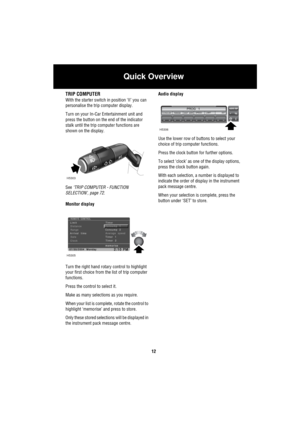
TRIP COMPUTER
With the starter switch in position ‘II’ you can
personalise the trip computer display.
Turn on your In-Car Entertainment unit and
press the button on the end of the indicator
stalk until the trip computer functions are
shown on the display.
See ‘TRIP COMPUTER - FUNCTION
SELECTION’, page 72.
Monitor display
Turn the right hand rotary control to highlight
your first choice from the list of trip computer
functions.
Press the control to select it.
Make as many...
Page 14
Quick Overview
13
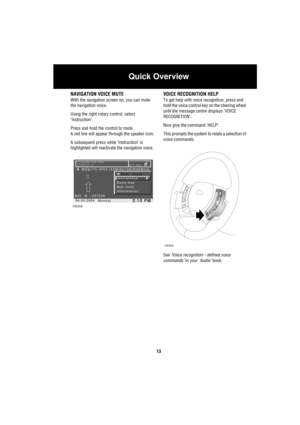
NAVIGATION VOICE MUTE
With the navigation screen on, you can mute
the navigation voice.
Using the right rotary control, select
‘Instruction’.
Press and hold the control to mute.
A red line will appear through the speaker icon.
A subsequent press while ‘Instruction’ is
highlighted will reactivate the navigation voice.
VOICE RECOGNITION HELP
To get help with voice recognition, press and
hold the voice control key on the steering wheel
until the message centre displays ‘VOICE...
Page 15
Quick Overview
14
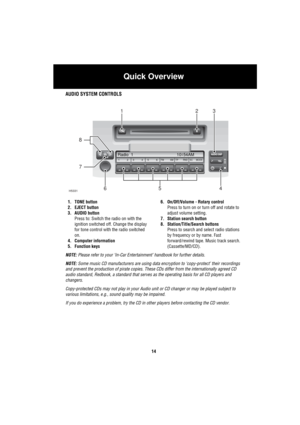
AUDIO SYSTEM CONTROLS
1. TONE button
2. EJECT button
3. AUDIO button
Press to: Switch the radio on with the
ignition switched off. Change the display
for tone control with the radio switched
on.
4. Computer information
5. Function keys6. On/Off/Volume - Rotary control
Press to turn on or turn off and rotate to
adjust volume setting.
7. Station search button
8. Station/Title/Search buttons
Press to search and select radio stations
by frequency or by name. Fast
forward/rewind tape....
Page 16
Quick Overview
15
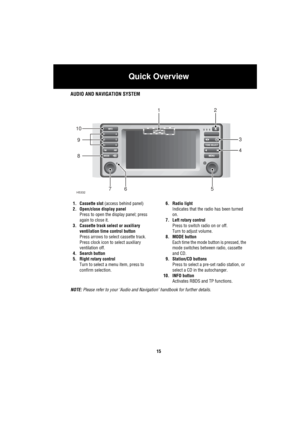
AUDIO AND NAVIGATION SYSTEM
1. Cassette slot (access behind panel)
2. Open/close display panel
Press to open the display panel; press
again to close it.
3. Cassette track select or auxiliary
ventilation time control button
Press arrows to select cassette track.
Press clock icon to select auxiliary
ventilation off.
4. Search button
5. Right rotary control
Turn to select a menu item, press to
confirm selection.6. Radio light
Indicates that the radio has been turned
on.
7. Left...
Page 17
Gas Station Information
16
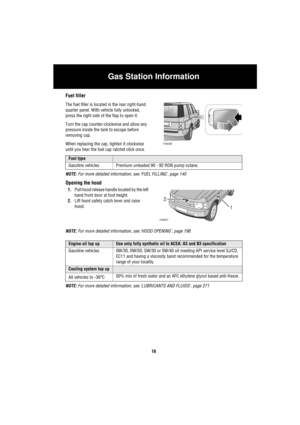
Gas Station  Information
 Ga s S ta ti on  In fo rm a ti onFuel filler
The fuel filler is located in the rear right-hand
quarter panel. With vehicle fully unlocked,
press the right side of the flap to open it.
Turn the cap counter-clockwise and allow any
pressure inside the tank to escape before
removing cap.
When replacing the cap, tighten it clockwise
until you hear the fuel cap ratchet click once.
NOTE: For more detailed information, see.‘FUEL FILLING’, page 140...
Page 18
Gas Station Information
17
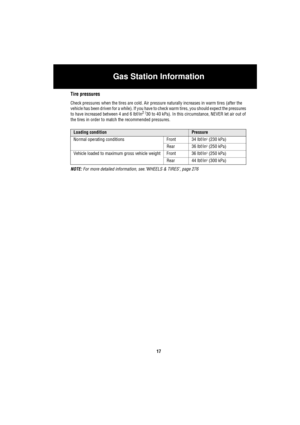
Tire pressures
Check pressures when the tires are cold. Air pressure naturally increases in warm tires (after the
vehicle has been driven for a while). If you have to check warm tires, you should expect the pressures
to have increased between 4 and 6 lbf/in
2 (30 to 40 kPa). In this circumstance, NEVER let air out of
the tires in order to match the recommended pressures.
NOTE: For more detailed information, see.‘WHEELS & TIRES’, page 276
Loading conditionPressure
Normal...
Page 20
19
Before You Drive 21
Before You Drive
REPORTING SAFETY DEFECTS . . . . . . . . . . . . . .  21
AUTO SAFETY HOTLINE  . . . . . . . . . . . . . . . . . . .  21
CALIFORNIA PROPOSITION 65 WARNING  . . . . .  21
BEFORE YOU DRIVE  . . . . . . . . . . . . . . . . . . . . . .  21
PASSPORT TO SERVICE  . . . . . . . . . . . . . . . . . . .  22
WARNINGS IN THIS HANDBOOK. . . . . . . . . . . . .  22
SYMBOLS USED  . . . . . . . . . . . . . . . . . . . . . . . . .  22
WARNING LABELS ATTACHED TO THE VEHICLE  22...
