Honeywell control panel OMNI 400600624848 User Manual
Here you can view all the pages of manual Honeywell control panel OMNI 400600624848 User Manual. The Honeywell manuals for Control panel are available online for free. You can easily download all the documents as PDF.
Page 1
FBII Security System
FBII Security SystemFBII Security System FBII Security System


O O
M M
N N
I I® ®
4 4
0 0
0 0
/ /
O O
M M
N N
I I® ®
6 6
0 0
0 0


O O
M M
N N
I I® ®
6 6
2 2
4 4
/ /
O O
M M
N N
I I® ®
8 8
4 4
8 8

User Guide


N9939V5  4/04 Rev. A
Page 2
- 2 -

Table Of Contents

QUICK REFERENCE .................................................................................................................... 3
INTRODUCTION........................................................................................................................... 6
SYSTEM REFERENCE ................................................................................................................7
ARMING THE...
Page 3
- 3 -

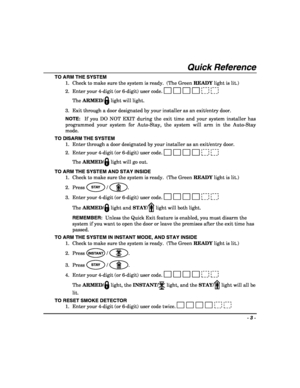
Quick Reference
TO ARM THE SYSTEM
1.  Check to make sure the system is ready.  (The Green READY light is lit.)

2.  Enter your 4-digit (or 6-digit) user code.
The ARMED/ light will light.
3.  Exit through a door designated by your installer as an exit/entry door.
NOTE:  If you DO NOT EXIT during the exit time and your system installer has
programmed your system for Auto-Stay, the system will arm in the Auto-Stay
mode.
TO DISARM THE SYSTEM
1.  Enter through a door designated by...
Page 4
- 4 -

Quick Reference (cont)
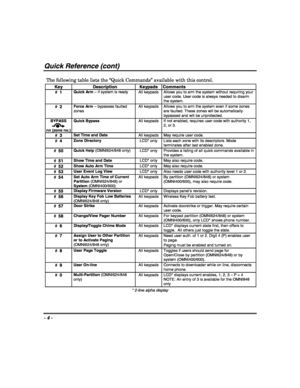
The following table lists the “Quick Commands” available with this control.
Key Description Keypads Comments
#  1 Quick Arm – if system is ready
All keypads  Allows you to arm the system without requiring your
user code. User code is always needed to disarm
the system.
#  2 Force Arm – bypasses faulted
zones All keypads  Allows you to arm the system even if some zones
are faulted. These zones will be automatically
bypassed and will be unprotected.
BYPASS

nn...
Page 5
- 5 -

Quick Reference (Cont’d)
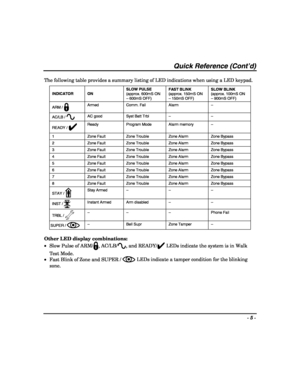
The following table provides a summary listing of LED indications when using a LED keypad.
INDICATOR ON SLOW PULSE
(approx. 600mS ON
– 600mS OFF) FAST BLINK
(approx. 150mS ON
– 150mS OFF) SLOW BLINK
(approx. 100mS ON
– 900mS OFF)
ARM /  Armed Comm. Fail Alarm –
AC/LB /  AC good  Syst Batt Trbl – –
READY / ✔ Ready Program Mode Alarm memory –
1  Zone Fault  Zone Trouble  Zone Alarm  Zone Bypass
2  Zone Fault  Zone Trouble  Zone Alarm  Zone Bypass
3   Zone...
Page 6
- 6 -

Introduction
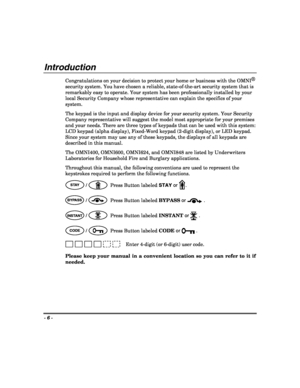
Congratulations on your decision to protect your home or business with the OMNI®

security system. You have chosen a reliable, state-of-the-art security system that is
remarkably easy to operate. Your system has been professionally installed by your
local Security Company whose representative can explain the specifics of your
system.

The keypad is the input and display device for your security system. Your Security
Company representative will suggest the model most...
Page 7
- 7 -

System Reference
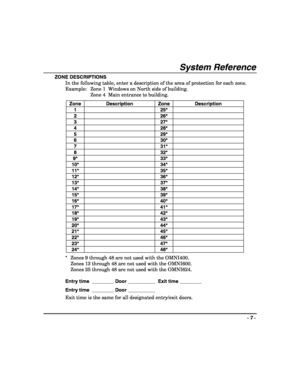
ZONE DESCRIPTIONS
In the following table, enter a description of the area of protection for each zone.
Example:  Zone 1  Windows on North side of building.
  Zone 4  Main entrance to building.
Zone Description Zone Description
1   25*
2   26*
3   27*
4   28*
5   29*
6   30*
7   31*
8   32*
9*   33*
10*   34*
11*   35*
12*   36*
13*   37*
14*   38*
15*   39*
16*   40*
17*   41*
18*   42*
19*   43*
20*   44*
21*   45*
22*   46*...
Page 8
- 8 -

System Reference (cont)
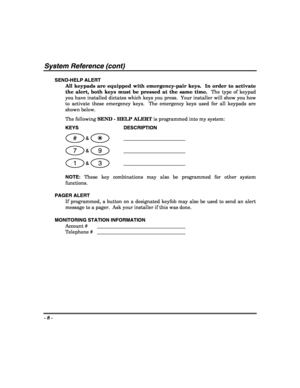
SEND-HELP ALERT
All keypads are equipped with emergency-pair keys.  In order to activate
the alert, both keys must be pressed at the same time.  The type of keypad
you have installed dictates which keys you press.  Your installer will show you how
to activate these emergency keys.  The emergency keys used for all keypads are
shown below.

The following SEND - HELP ALERT is programmed into my system:
KEYS DESCRIPTION
# & T
7 & 9
1 & 3

NOTE: These key...
Page 9
- 9 -

System Reference (cont)
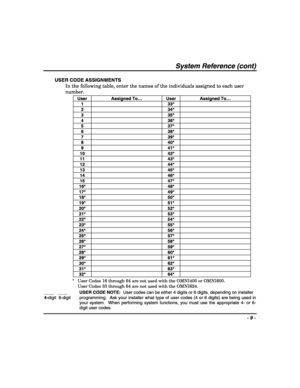
USER CODE ASSIGNMENTS
In the following table, enter the names of the individuals assigned to each user
number.
User Assigned To… User Assigned To…
1   33*
2   34*
3   35*
4   36*
5   37*
6   38*
7   39*
8   40*
9   41*
10   42*
11   43*
12   44*
13   45*
14   46*
15   47*
16*   48*
17*   49*
18*   50*
19*   51*
20*   52*
21*   53*
22*   54*
23*   55*
24*   56*
25*   57*
26*   58*
27*   59*
28*   60*
29*   61*...
Page 10
- 10 -

Arming the System
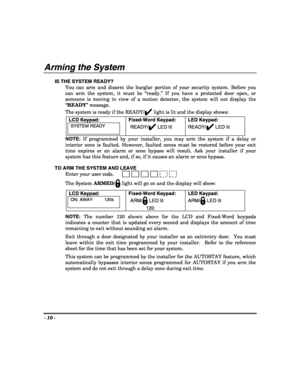
IS THE SYSTEM READY?
You can arm and disarm the burglar portion of your security system. Before you
can arm the system, it must be “ready.” If you have a protected door open, or
someone is moving in view of a motion detector, the system will not display the
“READY” message.
The system is ready if the READY/
✔ light is lit and the display shows:
LCD Keypad:

SYSTEM READY

Fixed-Word Keypad:
READY/✔ LED lit LED Keypad:

READY/✔ LED lit
NOTE: If programmed by your...
