Bose 131 marine speaker system Sold from 1997 User Manual
Here you can view all the pages of manual Bose 131 marine speaker system Sold from 1997 User Manual. The Bose manuals for Speaker System are available online for free. You can easily download all the documents as PDF.
Page 2
2              October 30, 2001                             AM188201_02_V.pdf
Safety, Warranty, and Technical Information
Please read this owner’s guide
The Bose® 131TM marine speaker system is engineered to provide sound quality far beyond
other marine speaker systems. This guide helps you install and use your speaker system
properly. Please read the installation section completely before cutting any holes. It is
important to understand the reasons for choosing one mounting hole size over the other....
Page 3
AM188201_02_V.pdf                                                                    October 30, 2001                                                                                                     3
Contents/Records
Bose B.V.
Nijverheidstraat 8, 1135 GE Edam
The NetherlandsAnton Schalkamp
 General Manager, Bose Europe
Manufacturer’s authorized EU representative     23 January 1997
Kind of equipment:  Loudspeaker
Type designation: 131™ marine speaker system
in accordance with EMC Directive...
Page 4
4              October 30, 2001                             AM188201_02_V.pdf
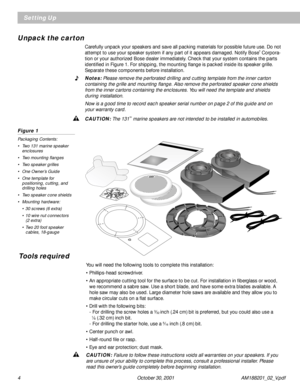
Tools required
You will need the following tools to complete this installation:
• Phillips-head screwdriver.
• An appropriate cutting tool for the surface to be cut. For installation in fiberglass or wood,
we recommend a sabre saw. Use a short blade, and have some extra blades available. A
hole saw may also be used. Large diameter hole saws are available and they allow you to
make circular cuts on a flat surface.
• Drill with...
Page 5
AM188201_02_V.pdf                                                                    October 30, 2001                                                                                                     5
Figure 2
Selecting the right locations
A.  Mount from the rear if you
can insert the speaker enclo-
sure behind the bulkhead
mounting surface.
B.  Mount from the front if you
cannot reach behind the
mounting surface. If you are
uncertain about the depth and
clearance behind your mount-
ing surface,...
Page 6
6              October 30, 2001                             AM188201_02_V.pdf
Test the speakers
It is a good idea to test your system before installation. With the power turned off, connect
the receiver to the speakers.
The provided speaker cord consists of two insulated wires; one is marked or ribbed, and is
always positive (+). The plain wire is always negative (–). The wires correspond to the red (+)
and black (–) terminals on the back of the speaker, receiver, or amplifier. Place the stripped
end of...
Page 7
AM188201_02_V.pdf                                                                    October 30, 2001                                                                                                     7
Installing Your Speakers From The Rear Of The Bulkhead
A
Drill a starter hole that is large enough
for your sabre saw blade. Be sure to
drill inside and close to the line you
have marked.
Installation from the rear of the bulkhead
A 4
Choose the 53⁄8 inch (13.6 cm) diameter hole size if you can...
Page 8
8              October 30, 2001                             AM188201_02_V.pdf
Hold the speaker enclosure up to the
hole from behind the bulkhead and find
the best position for the extended
portion of the enclosure. Be sure the
enclosure is hidden behind the bulkhead.
If the enclosure does not fit, use the file
or rasp to enlarge the hole. Use a half-round file or wood rasp to
smooth out any roughness in the hole
you have cut. Using the sabre saw, cut the hole for the
speaker, carefully following the...
Page 9
AM188201_02_V.pdf                                                                    October 30, 2001                                                                                                     9
Drill the marked holes using a 1⁄8 inch
(.32 cm) bit. Use a center punch to make
a slight indentation for your drill bit. This
will keep the drill bit from “walking” away
from the mark you have made.
Installing Your Speakers  From The Rear Of The Bulkhead
Mark six screw holes. Use the smallest
hole...
Page 10
10              October 30, 2001                             AM188201_02_V.pdf
Connect the speakers. Be sure the receiver or
amplifier is turned OFF. If possible, disconnect the
power source. Use the supplied silicone-filled wire
nuts to secure the ends of each wire pair. Place the
stripped end of the positive (+) right channel receiver
wire together with the stripped end of the positive (+)
right speaker wire. Place the wire nut over the ends of
the wires and turn it in a clockwise direction. Turn it...


