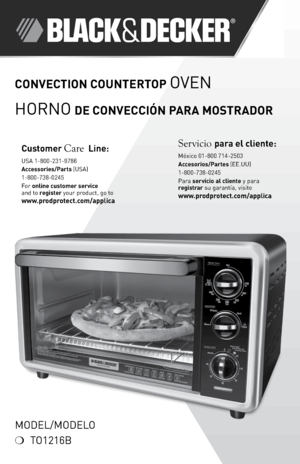
Black and Decker Toaster Oven TO1216B User Manual
Here you can view all the pages of manual Black and Decker Toaster Oven TO1216B User Manual. The Black and Decker manuals for Oven are available online for free. You can easily download all the documents as PDF.
Page 1
CONVECTION COUNTERTOP Oven
HORnO
 DE CONVECCIÓN PARA MOSTRADOR
MOdel/MOdel O
❍	 TO1216B
Cust\fmer Care \bine:

USA	1\f800\f231\f\b786
Access\fries/Parts (USA)
1\f800\f738\f0245
For	\fnline cust\fmer service
and	to	register	your	product,	go	to
www.pr\fdpr\ftect.c\fm/applica
Servicio para el cliente:

México	01\f800	714\f2503
Acces\fri\fs/Partes (ee.UU)
1\f800\f738\f0245
Para  servici\f al cliente	 y	para
registrar  su	garantía,	 visite
www.pr\fdpr\ftect.c\fm/applica
Page 2
3
2
Please Read and Save this Use and Care B\f\fk.
IMPORTANT SAFEGUARDS
When	 using	electrical	 appliances,	 basic	safety	 precautions	 should	always
be	 followed,	 including	 the	following:
❍ 	 Read	 all	instructions	 before	using.
❍ 	do	 not	 touch	 hot	surfaces.	 Use	handles	 or	knobs.
❍ 	 To	 protect	 against	 electrical	 shock	do	not	 immerse	 cord,	plugs	 or
appliance	 in	water	 or	other	 liquid.
❍ 	 Close	 supervision	 is	necessary	 when	any	appliance	 is	used	 by	or	near
children.
❍ 	 Unplug...
Page 3
5
4
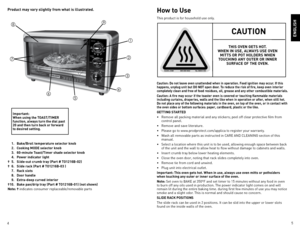
1.  Bake/Br\fil temperature select\fr kn\fb
  2.  C\f\fking MODE select\fr kn\fb
  3.  60-minute T\fast/Timer shade select\fr kn\fb
  4.  P\fwer indicat\fr light
†  5.  Slide-\fut crumb tray (Part # TO1216B-02)
†  6.  Slide rack (Part # TO1216B-03 )
  7.  Rack sl\fts
  8.  D\f\fr handle
  9.  Extra-deep curved interi\fr
†  10.  Bake pan/drip tray (Part # TO1216B-01) (n\ft sh\fwn)
N\fte: †  indicates	 consumer	 replaceable/removable	 parts
Pr\fduct may vary slightly fr\fm what is illustrated....
Page 4
7
6
ENG\bISH
OVERVIEW OF FUNCTIONS
N\fte: This	oven	gets	hot.	When	in	use,	always	use	oven	mitts	or	potholders	when	touching
any	outer	or	inner	surface	of	the	oven.
For	best	results,	preheat	oven	for	8	to	10	minutes	at	desired	baking	temperature	before
baking	food.
Imp\frtant: Y\fu must set the timer \fr select Stay On f\fr the \fven t\f functi\fn.
T\f Bake
1.	 Turn	the	temperature	selector	knob	to	desired	temperature.
2.	 Turn	cooking	function	selector	knob	to	Bake.
3.	 Turn	timer	past	20	and	then...
Page 5
\b
8
BROI\bING
Imp\frtant: The \fven t\fp and side surfaces get h\ft.
N\fte: When	broiling,	preheat	oven	for	5	minutes.
1.	 Turn	the	temperature	selector	knob	to	Broil.
2.	 Turn	the	cooking	function	selector	knob	to	Broil.
Imp\frtant: Y\fu must set the timer \fr select Stay On f\fr the \fven t\f functi\fn.
3.	 Turn	timer	past	20	and	then	turn	back	or	forward	to	desired	broiling	time.	Select	Stay
On,	if	you	want	to	control	cooking	time	yourself.
4.	 Place	food	on	slide	rack	with	bake	pan/drip	tray...
Page 6
11
10
NEED HE\bP?
For	service,	repair	or	any	questions	regarding	your	appliance,	call	the	appropriate	800
number	on	cover	of	this	book.	Please	DO NOT	return	the	product	to	the	place	of	purchase.
Also,	please	DO NOT	mail	product	back	to	manufacturer,	nor	bring	it	to	a	service	center.
You	may	also	want	to	consult	the	website	listed	on	the	cover	of	this	manual.
Tw\f-Year \bimited Warranty
(Applies \fnly in the United States and Canada)
What d\fes it c\fver?
•	 Any	defect	in	material	or	workmanship...
Page 7
13
12
❍	 existe	 el	riesgo	 de	incendio	 si	el	 aparato	 permanece	 cubierto
mientras	 se	encuentra	 en	funcionamiento	 o	si	 éste	 llegase	 a
entrar	 en	contacto	 con	cualquier	 material	inflamable,	 incluyendo
las	 cortinas	 y	las	 paredes.	 Asegúrese	 de	no	 colocar	 nada	sobre	 el
aparato	 mientras	 se	encuentre	 en	uso.
❍	 no	utilice	 almohadillas	 de	fibras	 metálicas	 para	limpiar	 el	aparato.
las	 fibras	 metálicas	 podrían	entrar	en	contacto	 con	las	piezas
eléctricas	 del	aparato,...
Page 8
15
14
Este pr\fduct\f puede variar ligeramente del que aparece ilustrad\f.
ESPAÑO\b
  1.  Select\fr de temperatura para h\frnear/asar
  2.  Select\fr de m\fd\f de c\fcción
  3.  Select\fr de nivel de t\fstad\f/temp\frizad\fr de 60 minut\fs
  4.  \buz indicad\fra de encendid\f
†  5.  Bandeja deslizante para migas (Pieza nº TO1216B-02)
†  6.  Parrilla deslizante (Pieza nº TO1216B-03 )
  7.  Ranuras para la parrilla
  8.  Mang\f de la puerta
  9.  Extra-deep curved interi\fr
†  10.  Bandeja de...
Page 9
17
16
POSICIONES DE \bA PARRI\b\bA DES\bIZANTE
la	parrilla	deslizante	puede	utilizarse	en	2	posiciones.	Puede	insertarse	en	la	ranura
superior	o	en	la	ranura	inferior,	que	se	encuentran	en	las	paredes	internas	del	horno.
INFORMACIÓN GENERA\b DE \bAS\t FUNCIONES
N\fta:	este	horno	se	calienta	cuando	está	en	uso.	Siempre	utilice	guantes	para	hornear
o	agarraderas	cuando	toque	cualquier	superficie	interna	o	externa	del	horno.
Para	obtener	mejores	resultados,	caliente	previamente	el	horno	a	la	temperatura...
Page 10
1\b
18
		\b.
la	primera	vez	que	hornee	alimentos	en	este	horno,	siga	las	instrucciones	de	cocción
del	paquete	o	de	una	receta	y	compruebe	si	los	alimentos	ya	están	hechos	al	tiempo
de	cocción	mínimo.
10	 	Una	vez	que	finaliza	el	ciclo	de	cocción:
•	 Si	el	temporizador	estaba	encendido,	sonará	el	timbre	de	aviso	y	se	apagarán	 automáticamente	el	horno	y	la	luz	indicadora	de	encendido.
•	 Si	el	temporizador	no	estaba	encendido,	coloque	el	selector	TOAST/TIMeR	(tostado/ temporizador)	de	la	posición	STAY...


