Home
>
Black and Decker
>
Coffeemaker
>
Black and Decker 12CUP PROGRAMMABLE COFFEEMAKER DCM3200B User Manual
Black and Decker 12CUP PROGRAMMABLE COFFEEMAKER DCM3200B User Manual
Here you can view all the pages of manual Black and Decker 12CUP PROGRAMMABLE COFFEEMAKER DCM3200B User Manual. The Black and Decker manuals for Coffeemaker are available online for free. You can easily download all the documents as PDF.
Page 1
Please Read and Save this Use and Care Book
Por favor lea este instructivo antes de usar el producto
Veuillez lire et conserver ce guide d’entretien et d’utilisation
Models
Modelos
Modèles
❑ DCM3200B
12-Cup Programmable
Coffeemaker
Cafetera programable
de 12 tazas
Cafetière programmable
de 12 tasses
USA/Canada  1-800-231-9786
Mexico   01-800-714-2503
www.applicaconsumerproductsinc.com
IMPORTANT / IMPORTANTE /IMPORTANT
WASH CARAFE BEFORE FIRST USE!
LAVE LA JARRA ANTES DEL PRIMER USO
LAVER LA...
Page 2
21
IMPORTANT SAFEGUARDS
When using electrical appliances, basic safety precautions should always be
followed to reduce the risk of fire, electric shock and/or injury to persons,
including the following:
❑ Read all instructions.
❑ Do not touch hot surfaces. Use handle or knobs.
❑ To protect against electric shock, do not place cord, plug or appliance in
water or other liquids.
❑ Close supervision is necessary when any appliance is used by or near
children.
❑ Unplug from outlet when not in use and...
Page 3
43
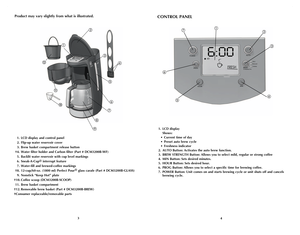
Product may vary slightly from what is illustrated.
 1.  LCD display
    Shows:
 • Current time of day
  • Preset auto brew cycle
  • Freshness indicator
 2. AUTO Button: Activates the auto brew function.
 3. BREW STRENGTH Button: Allows you to select mild, regular or strong coffee
 4. MIN Button: Sets desired minutes.
 5. HOUR Button: Sets desired hour.
 6. PROG Button: Allows you to select a specific time for brewing coffee.
 7. POWER Button: Unit comes on and starts brewing cycle or unit shuts...
Page 4
65
How to Use
This product is for household use only.
GETTING STARTED
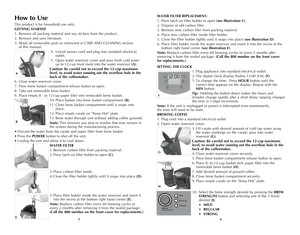
1. Remove all packing material and any stickers from the product.
2. Remove and save literature.
3. Wash all removable parts as instructed in CARe  AnD CLeAnIng section
of this manual.
 4. Uncoil power cord and plug into standard electrical
outlet.
 5. Open water reservoir cover and pour fresh cold water
up to 12-cup level mark into the water reservoir (A).
Caution: Be careful not to exceed the 12-cup maximum
level, to avoid...
Page 5
Note:  The BREW STRENGTH can be selected before or after brewing begins.
11. Press the POWER button and brewing begins.
Note:  To delay brewing see, DELAyED BREWING section.
 12.  Once the brewing cycle is complete the word FRESH
    and the FRESH icon will appear on the digital
   display (K).
 13.  Press brew basket compartment release button
    to open.
 14.  Use basket handle to carefully remove and discard
    used grounds and paper filter. Replace basket and
   close brew basket...
Page 6
109
3. Place carbon filter on top of a paper towel.
4. Filter holder is top rack dishwasher safe or it may be hand washed in warm,
sudsy water.
5. Rinse carbon filter with tap water.
6. Place carbon filter back inside filter holder.
7. Close the filter holder tightly until it snaps into place (see illustration D).
8. Place filter holder inside the water reservoir and insert it into the recess at the
bottom right hand corner (see illustration E).
Note: To replace filter see WATeR FILTeR RePLACeMenT...
Page 7
1211
GUARDE ESTAS INSTRUCCIONES.
ENCHUFE POLARIZADO (Solamente para los modelos de 120V)
este aparato cuenta con un enchufe polarizado (un contacto es más ancho que el otro).
A fin de reducir el riesgo de un choque eléctrico, este enchufe encaja en una toma de
corriente polarizada en un solo sentido. Si el enchufe no entra en la toma de corriente,
inviértalo y si aun así no encaja, consulte con un electricista. Por favor no trate de
alterar esta medida de seguridad
TORNILLO DE SEGURIDAD
Advertencia:...
Page 8
1314
PANEL DE CONTROL
 1.  Pantalla VCL exhibe
  • La hora actual
  • Ciclo de colado programado
  • Indicador de frescura del café
 2.  Botón AUTO: Inicia el ciclo de colado automático de la cafetera
 3.  Botón de intensidad del café (BREW STRENGTH): ligero, regular o café fuerte
 4.  Botón (MIN): Programa los minutos
 5.  Botón (HOUR): Programa la hora
 6.  Botón PROG: Programa la hora del colado automático
 7.  Botón de interrupción (POWER): Enciende el aparato e inicia o apaga y cancela      el...
Page 9
1516
5. Coloque el porta filtro adentro del tanque de agua e
insértelo en la hendidura inferior, a la derecha (E).
Nota: Reemplace el filtro de carbón después de cada
60 ciclos, o cada dos meses después de removerlo del
empaque sellado. (Para repuestos, por favor llame gratis al
número 800 en la cubierta.)
COMO REEMPLAZAR EL FILTRO DE AGUA
1.   Presione la aldaba para abrir (consultar ilustración C).
2.  Deseche el filtro de carbón usado.
3. Desempaque el filtro de carbón nuevo.
4. Instale el...
Page 10
1718
3. La pantalla digital exhibe la 1:00 o la hora programada anteriormente para el
ciclo de colado automático.
4. Para cambiar la hora: Presione el botón HOUR hasta que aparezca la hora
correcta en la pantalla. Pepita el mismo proceso con el botón de minutos MIN.
5. Presione el botón PROG nuevamente.   el colado automático ha sido
programado
6. Presione el botón AUTO para activar el ciclo de colado automático. La luz
indicadora AUTO se ilumina y aparece el logo AUTO.
7. Para verificar la hora...


