Home
>
Black and Decker
>
Coffeemaker
>
Black and Decker 12CUP PROGRAMMABLE COFFEEMAKER BCM1410BDC User Manual
Black and Decker 12CUP PROGRAMMABLE COFFEEMAKER BCM1410BDC User Manual
Here you can view all the pages of manual Black and Decker 12CUP PROGRAMMABLE COFFEEMAKER BCM1410BDC User Manual. The Black and Decker manuals for Coffeemaker are available online for free. You can easily download all the documents as PDF.
Page 1
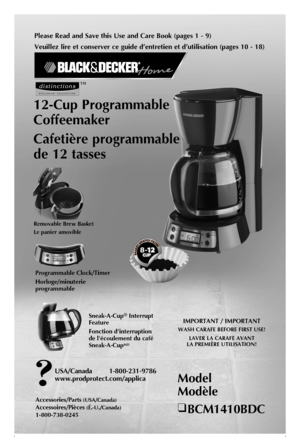
Please Read and Save this Use and Care Book (pages 1 - 9)
Veuillez lire et conserver ce guide d’entretien et d’utilisation (pages 10 - 18)
Model
Modèle
❑ BCM1410BDC
USA/Canada  1-800-231-9786
www.prodprotect.com/applica
Accessories/Parts (USA/Canada)
Accessoires/Pièces (É.-U./Canada)
1-800-738-0245
Removable Brew Basket
Le panier amovible
Sneak-A-Cup® Interrupt Feature
Fonction d'interruption de l'écoulement du café Sneak-A-CupMD
Programmable Clock/Timer
Horloge/minuterie programmable
™...
Page 2
21
When using electrical appliances, basic safety precautions should always
be followed to reduce the risk of fire, electric shock, and/or injury to
persons, including the following:
q Read all instructions.
q Do not touch hot surfaces. Use handle or knobs.
q To protect against electric shock, do not place cord, plug or appliance
in water or other liquids.
q Close supervision is necessary when any appliance is used by or near
children.
q Unplug from outlet when not in use and before cleaning. Allow...
Page 3
43
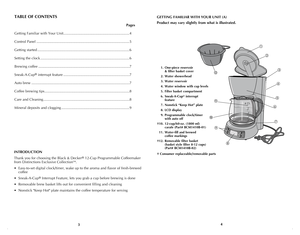
TABLE OF CONTENTS
 Pages
Getting Familiar with Your Unit ..................................................................4
Control Panel  .............................................................................................5
Getting started ............................................................................................6
Setting the clock .........................................................................................6
Brewing coffee...
Page 4
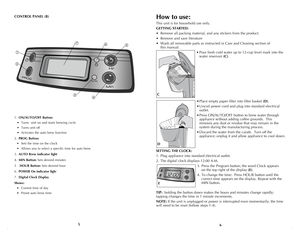
65 CONTROL PANEL (B) 1. ON/AUTO/OFF Button: • Turns unit on and starts brewing cycle • Turns unit off • Activates the auto brew function 2. PROG Button: • Sets the time on the clock • Allows you to select a specific time for auto brew 3. AUTO Brew indicator light 4. MIN Button: Sets desired minutes 5 HOUR Button: Sets desired hour 6. POWER On indicator light 7. Digital Clock Display Shows: • Current time of day • Preset auto brew time How to use: This unit is for...
Page 5
87
BREWING COFFEE:
1. Fill water reservoir with cold tap water using water
markings on carafe for desired amount (F). Do not
exceed the 12-cup maximum level (G).
2. Place basket style paper filter into the removable filter
basket.
3.  Place the filter basket into the filter basket
compartment (H).
4. Add desired amount of ground coffee.
5. Close the filter basket cover securely.
6. Place empty carafe on “Keep Hot” plate.
7. Plug cord into standard electrical outlet.
 8.  Press ON/AUTO/OFF button;...
Page 6
109
6. Wipe surfaces with a damp cloth, then close the one
piece water reservoir and brew basket cover (K).
Carafe Care
Note: A damaged carafe may result in possible burns
from a hot liquid.
To avoid breaking:
• Do not allow all liquid to evaporate from the carafe
while on the "Keep Hot" plate or heat the carafe when
empty.
• Discard the carafe if chipped, cracked, or damaged in
any manner.
• Never use abrasive scouring pads or cleansers; they will scratch and weaken
the glass.
• Do not...
Page 7
1211
q Ne pas nettoyer la carafe avec des produits nettoyants abrasifs, de
la laine d’acier ni tout autre produit abrasif.
q Utiliser l’appareil uniquement aux fins auxquelles il a été prévu.
q Pour débrancher, mettre les commandes sur « OFF » puis tirer la
fiche de la prise.
q On peut se brûler si on enlève le couvercle pendant les cycles
d’infusion.
CONSERVER CES MESURES.
FICHE POLARISÉE (Modèles de 120 V seulement)
L'appareil est muni d'une fiche polarisée (une lame plus large que...
Page 8
COMPRENDRE LE FONCTIONNEMENT L’APPAREIL (A)
Le produit peut différer légèrement de celui illustré.
TABLEAU DE COMMANDE (B)
1. Bouton de marche/infusion automatique/arrêt (ON/AUTO/OFF) :
  •  Met en marche l’appareil et commence le cycle d’infusion.
 •  Arrête l’appareil.
 •  Active la fonction d’infusion automatique
2. Bouton de programme (PROG) :
  •  Sert à régler l’heure de l’horloge.
 •  Permet de choisir une heure précise pour démarrer le cycle d’infusion automatique
3. Témoin de fonctionnement...
Page 9
1615
Utilisation
Cet appareil est conçu pour un usage domestique seulement.
POUR COMMENCER
• Retirer le matériau d’emballage et les autocollants de l’appareil.
• Retirer et mettre de côté les instructions.
• Laver toutes les pièces amovibles en suivant les recommandations de la section
Entretien et nettoyage du présent guide.
•  Verser de l’eau froide dans le réservoir jusqu’à la
marque indiquant 12 tasses sur l’indicateur (C).
• Placer un filtre en papier vide dans le panier filtre (D).
•  Dérouler...
Page 10
1817
3. L’horloge numérique affiche 12 : 00 AM (J).
4. Pour changer l’heure : Appuyer sur le bouton de
réglage des heures (HOUR) jusqu’à ce que l’heure
désirée s’affiche. Recommencer avec le bouton de
réglage des minutes (MIN).
5. Appuyer deux fois sur le bouton ON/AUTO/OFF; le témoin de fonctionnement
rouge s’allume, suivi du témoin vert AUTO.
6. Lorsque l’infusion commence à l’heure programmée, le témoin vert s’éteint
et le voyant rouge s’allume.
7. Pour annuler le processus d’infusion...


