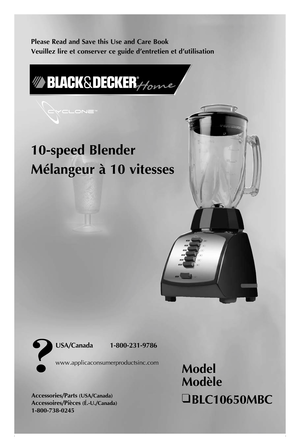
Black and Decker 10SPEED BLENDER BLC10650MBC User Manual
Here you can view all the pages of manual Black and Decker 10SPEED BLENDER BLC10650MBC User Manual. The Black and Decker manuals for Blender are available online for free. You can easily download all the documents as PDF.
Page 1
Model
Modèle
❑	BLC10650MBC
USA/Canada	 1-800-231-9786
www.applicaconsumerproductsinc.com
Please	Read	and	Save	 this	Use	 and	Care	 Book
Veuillez	 lire	et	conserver	 ce	guide	 d’entretien	 et	d’utilisation
Accessories/Parts	(USA/Canada)
Accessoires/Pièces	(É.-U./Canada)
1-800-738-0245
10-speed	 Blender
Mélangeur	à	10	 vitesses
Page 2
21
IMPORTANT	SAFEGUARDS
When using electrical appliances, basic safety precautions should
always be followed, including the following:
❑ Read all instructions.
❑ To protect against risk of electrical shock, do not put blender base,
cord or plug in water or other liquid.
❑ Close supervision is necessary when any appliance is used by or
near children.
❑ Unplug from outlet when not in use, before putting on or taking
off parts and before cleaning.
❑ Avoid contacting moving parts.
❑ Do not operate any...
Page 3
43
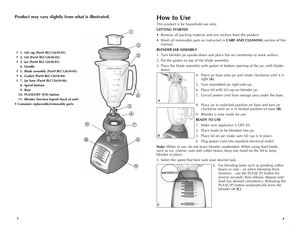
	 †	 1.	 Lid	cap	(Part#	 BLC12650-01)
	 †	 2.	 Lid	 (Part#	BLC12650-02)
		†	 3.	 Jar	 (Part#	BLC12650-03)
	 	 4.	 Handle
		†	 5.	 Blade	 assembly	(Part#	BLC12650-05)
	 †	 6.	 Gasket	 (Part#	BLC12650-04)
	 †	 7.	 Jar	 base	(Part#	 BLC12650-06)
	 	 8.	 Speed	 buttons
	 	 9.	 Base
	 		10.	 PULSE/OFF	 (P/0)	button
	 	 11.	 Blender	 function	legend	(back	of	unit)
†	Consumer	 replaceable/removable	 parts
Product	may	vary	 slightly	 from	what	 is	illustrated.How	 to	Use
This product is for household use...
Page 4
65
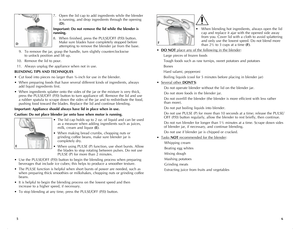
7. Open the lid cap to add ingredients while the blender
is running, and drop ingredients through the opening
(D).
Important:	 Do	not	 remove	 the	lid	while	 the	blender	 is
running.
8. When finished, press the PULSE/OFF (P/0) button.
Make sure blades have completely stopped before
attempting to remove the blender jar from the base.
 9.  To remove the jar, grasp the handle, turn slightly counterclockwise
    to unlock position and lift up.
 10.  Remove the lid to pour.
 11.  Always unplug the...
Page 5
8
7
Care	and	Cleaning
This product contains no user serviceable parts. Refer service to qualified service
personnel.
CLEANING
1. Before cleaning, turn off and unplug the appliance.
2. Lift the jar off the power base by the handle.
3. Remove jar base by turning it counterclockwise until loose.
4. Remove the gasket and the blade assembly.
Caution:	 Blades	are	sharp,	 handle	 carefully.
5. Remove lid and lid cap.
6. Wash removable parts by hand or in the dishwasher. Place the jar on the
bottom rack and...
Page 6
109
RECIPES
WILD	BERRY	 YOGURT	 COOLER
2 cups pineapple juice
1 cup wild berry frozen yogurt
1 cup frozen cubed mango
1 cup frozen hulled strawberries
Combine all ingredients in order listed in blender jar and close with lid. PULSE (P)
for several seconds, three to four times. Press SMOOTHIE (10) and let cycle run
until mixture is smooth and well blended; about 30 seconds.
Makes about 4½ cups.
CRAN-PINEAPPLE	 COLADA
1½ cups cran-apple juice
1 cup fresh pineapple chunks
²/³ cup frozen piña colada drink...
Page 7
1211
MANGO	RASPBERRY	 FIZZ
1½ cups pineapple mango juice
1½ cups raspberry sorbet
1 cup frozen sliced peaches
Cold club soda
Mint sprigs
Combine first 3 ingredients in order listed in blender jar. Close cover. PULSE (P)
for several seconds, three to four times. Press SMOOTHIE (10) and let run until
mixture is smooth and well blended; about 30 seconds.
Fill tall beverage glasses half-full with raspberry mixture; top of with club soda.
Stir to blend. Garnish with mint sprig.
Makes 4 to 6 drinks....
Page 8
1413
PEA	AND	 POTATO	 BISQUE
1 small onion, chopped
2 medium cloves garlic, minced
2 tbsp. butter or margarine
4 cups chicken broth or stock
2 cups cubed peeled potatoes
½ tsp. ground ginger
½ tsp. salt
¼ tsp. black pepper
1½ cups frozen peas
¼ cup loosely packed parsley leaves
½ cup heavy cream
In medium saucepan, cook onion and garlic in butter over medium heat until
tender. Add chicken broth, potatoes ginger, salt and pepper. Bring to boil. Cover
and simmer 8 minutes. Add peas and parsley; continue...
Page 9
1516
FICHE	POLARISÉE	(Modèles	 de	120	 V	seulement)
L'appareil est muni d'une fiche polarisée (une lame plus large que l'autre). Afin de
minimiser les risques de secousses électriques, ce genre de fiche n'entre que d'une
façon dans une prise polarisée. Lorsqu'on ne peut insérer la fiche à fond dans la
prise, il faut tenter de le faire après avoir inversé les lames de côté. Si la fiche n'entre
toujours pas dans la prise, il faut communiquer avec un électricien certifié. Il...
Page 10
1718
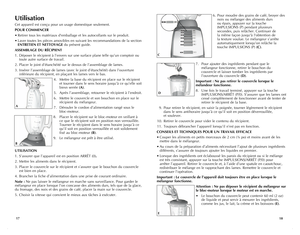
Utilisation
Cet appareil est conçu pour un usage domestique seulement.
POUR	COMMENCER
• Retirer tous les matériaux d'emballage et les autocollants sur le produit.
• Laver toutes les pièces amovibles en suivant les recommandations de la section
ENTRETIEN	ET	 NETTOYAGE du présent guide.
ASSEMBLAGE	DU	RÉCIPIENT
1. Déposer le récipient à l’envers sur une surface plane telle qu’un comptoir ou
toute autre surface de travail.
2. Placer le joint d’étanchéité sur le dessus de l’assemblage de lames....
