BenQ Mp525 St Dlp Users Manual
Here you can view all the pages of manual BenQ Mp525 St Dlp Users Manual. The BenQ manuals for Projector are available online for free. You can easily download all the documents as PDF.
Page 1
We l c o m e
MP515 ST/MP525 ST
Digital Projector
User Manual
Downloaded From projector-manual.com BenQ Manuals
Page 2
Table of contents 2
Ta b l e  o f  c o n t e n t s
Important safety
instructions ......................... 3
Introduction........................ 7
Projector features .................................. 7
Shipping contents .................................. 8
Projector exterior view .......................... 9
Controls and functions ....................... 10
Positioning your
projector ............................ 14
Choosing a location............................. 14
Obtaining a preferred projected...
Page 3
Important safety instructions 3
Important safety instructions
Your projector is designed and tested to meet the latest standards for safety of
information technology equipment. However, to ensure safe use of this product, it is
important that you follow the instructions mentioned in this manual and marked on
the product.
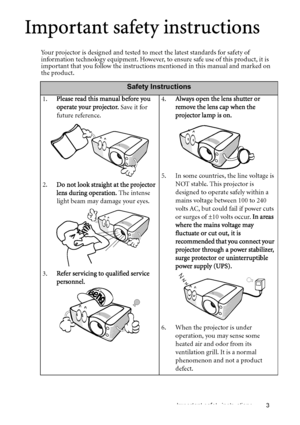
Safety Instructions
1.Please read this manual before you
operate your projector. Save it for
future reference.
2.Do not look straight at the projector
lens during operation. The...
Page 4
Important safety instructions 4

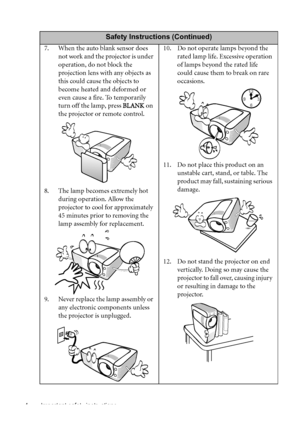
Safety Instructions (Continued)
7. When the auto blank sensor does
not work and the projector is under
operation, do not block the
projection lens with any objects as
this could cause the objects to
become heated and deformed or
even cause a fire. To temporarily
turn off the lamp, press BLANK on
the projector or remote control.
8. The lamp becomes extremely hot
during operation. Allow the
projector to cool for approximately
45 minutes prior to removing the...
Page 5
Important safety instructions 5

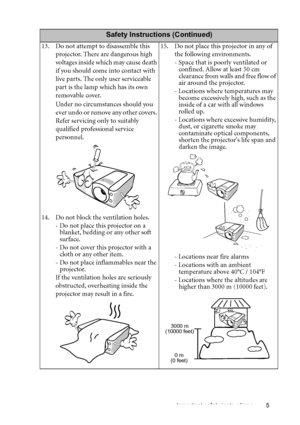
Safety Instructions (Continued)
13. Do not attempt to disassemble this
projector. There are dangerous high
voltages inside which may cause death
if you should come into contact with
live parts. The only user serviceable
part is the lamp which has its own
removable cover.
Under no circumstances should you
e ve r  u n do  or  re m ove  a ny  o t h e r  cove rs .
Refer servicing only to suitably
qualified professional service
personnel.
14. Do not block the...
Page 6
Important safety instructions 6
Safety Instructions (Continued)
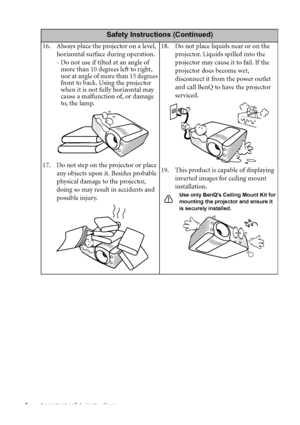
16. Always place the projector on a level,
horizontal surface during operation.
- Do not use if tilted at an angle of
more than 10 degrees left to right,
nor at angle of more than 15 degrees
front to back. Using the projector
when it is not fully horizontal may
cause a malfunction of, or damage
to, the lamp.
17. Do not step on the projector or place
any objects upon it. Besides probable
physical damage to the projector,
doing so...
Page 7
Introduction 7
Introduction
Projector features
The projector integrates high-performance optical engine projection and a user-friendly
design to deliver high reliability and ease of use.
The projector offers the following features.
•  Wall color correction allowing projection on surfaces of several predefined colors
•  Quick auto search speeding up the signal detecting process
•  Selectable password protected function
•  3D color management allowing color adjustments to your liking
•  Selectable quick...
Page 8
Introduction 8
Shipping contents
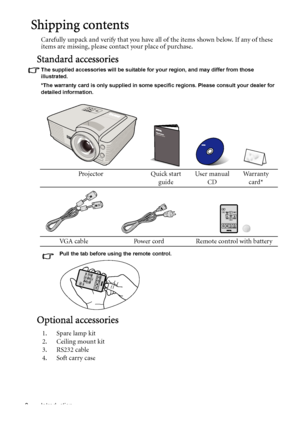
Carefully unpack and verify that you have all of the items shown below. If any of these
items are missing, please contact your place of purchase.
Standard accessories
The supplied accessories will be suitable for your region, and may differ from those
illustrated.
*The warranty card is only supplied in some specific regions. Please consult your dealer for
detailed information.
Pull the tab before using the remote control.
Optional accessories
Projector Quick start...
Page 9
Introduction 9
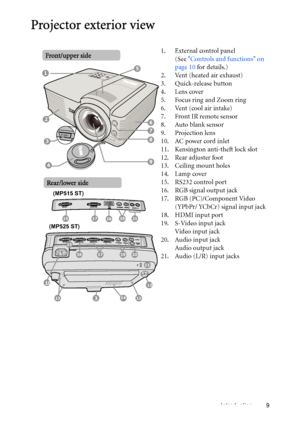
Projector exterior view
1. External control panel
(See Controls and functions on
page 10 for details.)
2. Vent (heated air exhaust)
3. Quick-release button
4. Lens cover
5. Focus ring and Zoom ring
6. Vent (cool air intake)
7. Front IR remote sensor
8. Auto blank sensor
9. Projection lens
10. AC power cord inlet
11. Kensington anti-theft lock slot
12. Rear adjuster foot
13. Ceiling mount holes
14. Lamp cover
15. RS232 control port
16. RGB signal output jack
17. RGB (PC)/Component Video...
Page 10
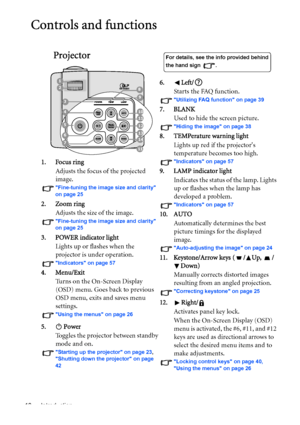
Introduction 10
Controls and functions
Projector
1. Focus ring
Adjusts the focus of the projected
image.
Fine-tuning the image size and clarity
on page 25
2. Zoom ring
Adjusts the size of the image.
Fine-tuning the image size and clarity
on page 25
3. POWER indicator light
Lights up or flashes when the
projector is under operation.
Indicators on page 57
4. Menu/Exit
Turns on the On-Screen Display
(OSD) menu. Goes back to previous
OSD menu, exits and saves menu
settings.
Using the menus on page 26...

