Sony Digital Camcorder DSR PD150 Operating Instructions
Here you can view all the pages of manual Sony Digital Camcorder DSR PD150 Operating Instructions. The Sony manuals for Camcorder are available online for free. You can easily download all the documents as PDF.
Page 1
3-060-817-13 (1)
Digital
Camcorder
Operating Instructions
Before operating the unit, please read this manual thoroughly,
and retain it for future reference.
Owner’s Record
The model and serial numbers are located on the bottom. Record the
serial number in the space provided below. Refer to these numbers
whenever you call upon your Sony dealer regarding this product.
Model No. DSR-PD150Model No. AC-
Serial No. Serial No.
DSR-PD150
©2000 Sony Corporation
DSR-PD150
Page 2
2
WARNING
To prevent fire or shock hazard, do
not expose the unit to rain or
moisture.
This symbol is intended to alert
the user to the presence of
uninsulated “dangerous voltage”
within the product’s enclosure
that may be of sufficient
magnitude to constitute a risk of
electric shock to persons.
This symbol is intended to alert
the user to the presence of
important operating and
maintenance (servicing)
instructions in the literature
accompanying the appliance.
Never expose the battery pack to...
Page 3
3
Table of contents
Quick Start Guide ............................................... 4
Getting started
Using this manual ............................................... 6
Checking supplied accessories ......................... 8
Step 1  Installing the microphone ..................... 9
Step 2  Preparing the power supply .............. 10
Step 3  Inserting a cassette ............................... 15
Recording – Basics
Recording a picture .......................................... 16
Shooting backlit...
Page 4
4
Quick Start Guide
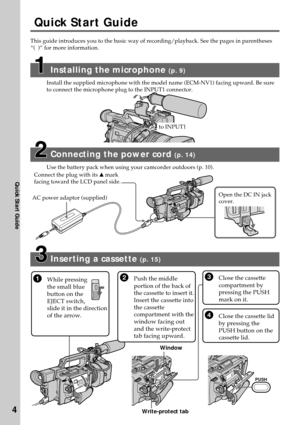
Quick Start Guide
This guide introduces you to the basic way of recording/playback. See the pages in parentheses
“(  )” for more information.
Connecting the power cord (p. 14)
Use the battery pack when using your camcorder outdoors (p. 10).
AC power adaptor (supplied)Connect the plug with its v mark
facing toward the LCD panel side.
Open the DC IN jack
cover.
Inserting a cassette (p. 15)
1While pressing
the small blue
button on the
EJECT switch,
slide it in the direction
of the...
Page 5
5
Quick Start Guide
Recording a picture (p. 16)
Viewfinder
When the LCD panel
is closed, use the
viewfinder placing
your eye against its
eyecup.1Remove the hood cap.
2Set the POWER switch to
CAMERA while pressing the
small green button.
If the ND1 or ND2 indicator
flashes, see page 46.
3Slide OPEN
back in the  B
mark direction
to open the
LCD panel.
Monitoring the playback picture on the LCD
screen
 (p. 26)
1Set the POWER switch to
VCR while pressing the
small green button.
2Press m to rewind
the tape....
Page 6
6
— Getting started —
Using this manual
As you read through this manual, buttons and settings on your camcorder are shown in
capital letters.
e.g. Set the POWER switch to CAMERA.
When you carry out an operation, you can hear a beep or a melody sound to indicate
that the operation is being carried out.
Note on cassette memory
Your camcorder is based on the DVCAM/DV format. We recommend that you use a
tape with cassette memory .
The functions which require different operations depending on whether or not...
Page 7
7
Getting started
Using this manual
Note on TV color systems
TV color systems differ from country to country.
To view your recordings on a TV, you need an NTSC system-based TV.
Copyright precautions
Television programs, films, video tapes, and other materials may be copyrighted.
Unauthorized recording of such materials may be contrary to the provision of the
copyright laws.
Precautions on camcorder care
•The LCD screen and the viewfinder are manufactured using high-precision
technology. However, there...
Page 8
8
Checking supplied accessories
Make sure that the following accessories are supplied with your camcorder.
12 3
4
56
789
0
qa
1Wireless Remote Commander (1)
(p. 167)
2AC-L10A/L10B/L10C AC power
adaptor (1), Power cord (1) (p. 11)
3NP-F330 battery pack (1) (p. 10, 11)
4Size AA (R6) battery for Remote
Commander (2) (p. 168)
5Memory Stick Reader/Writer (1), USB
cable (1), Driver software (CD-ROM)
(1)
6“Memory Stick” (1) (p. 113)7A/V connecting cable (1) (p. 31, 72)
8Hood cap (1) (p. 16)
9Shoulder strap (1)...
Page 9
9
Getting started
Step 1  Installing the microphone
Install the supplied microphone. Be sure to connect the microphone plug to the INPUT1
connector.
(1)Attach the wind screen to the microphone.
(2)Loosen the microphone holder screw and open the cover.
(3)Place the microphone into the holder with the model name (ECM-NV1) facing
upward, close the cover, and tighten the screw.
(4)Connect the plug of the microphone to the INPUT 1 connector.
(5)Set the INPUT LEVEL selector to MIC or MIC ATT. When set to MIC...
Page 10
10
Step 2  Preparing the power supply
Installing the battery pack
Install the battery pack to use your camcorder outdoors.
(1)Lift up the viewfinder.
(2)Insert the battery pack in the direction of the V mark on the battery pack. Slide
the battery pack until it is locked.
To remove the battery packLift up the viewfinder.
Slide the battery pack out in the direction of the arrow while pressing BATT RELEASE
down.
12
BATT
RELEASE


