LG 15lc1r Owners Manual
Here you can view all the pages of manual LG 15lc1r Owners Manual. The LG manuals for Television are available online for free. You can easily download all the documents as PDF.
Page 1
LCD TV
Please read this manual carefully before operating your set.
Retain it for future reference.
Record model number and serial number of the set.
See the label attached on the back cover and quote
this  information to your dealer when you require service.
OWNER’S MANUAL
MODELS: 15LS1R *20LS1R *
20LS2R *23LS2R *
15LC1R *20LC1R *
Page 2
Contents
Installation 3
Location and function of controls 8
Remote control handset
Battery installation / Front / Rear
Basic operation 14
On and off
On-Screen Menu Language/Country Selection
On screen menus 15
Menu selection / Programme selection
Volume adjustment
Setting up TV stations 16
Auto programme tuning
Manual programme tuning
Programme edit / Favourite programme
Calling the programme table
Picture adjustment 21
PSM (Picture Status Memory)
Picture adjustment
CSM (Colour Status Memory)
XD...
Page 3
3
ENGLISH
Installation
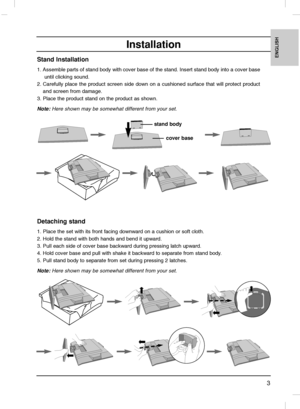
Stand Installation
1. Assemble parts of stand body with cover base of the stand. Insert stand body into a cover baseuntil clicking sound.
2. Carefully place the product screen side down on a cushioned surface that\
 will protect product and screen from damage.
3. Place the product stand on the product as shown.
Note: Here shown may be somewhat different from your set.
stand body
cover base
Detaching stand
1. Place the set with its front facing downward on a cushion or soft clo\...
Page 4
Installation
4
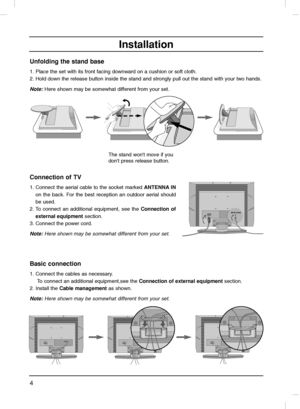
Basic connection
1. Connect the cables as necessary.
To connect an additional equipment,see the Connection of external equipmentsection.
2. Install the Cable managementas shown.
Note:Here shown may be somewhat different from your set.
Connection of TV
1. Connect the aerial cable to the socket marked ANTENNA IN
on the back. For the best reception an outdoor aerial should
be used.
2. To connect an additional equipment, see the Connection of
external equipmentsection.
3. Connect the power...
Page 5
5
ENGLISH
Installation
How to remove the Cable management
First, press the cable management.
Hold the Cable managementwith both hands and pull it upward.
Note:Do not hold the CABLE MANAGEMENT when moving the product. (If the product is dropped,you
may be injured or the product may be broken.)
Wall Mount: Horizontal installation
4 inches
4 inches4 inches4 inches
4 inchesR
R
For proper ventilation, allow a clearance of 4 on each side and from the wall. Detailed installation
instructions are available from...
Page 6
6
Installation
Positioning your display
Adjust the position of the panel in various ways for maximum comfort.

10~1230

• Tilt range
Location
Position your set so that no bright light or sunlight falls directly ont\
o the screen. Care should be taken
not to expose the set to any unnecessary vibration, moisture, dust or he\
at. Also ensure that the set is
placed in a position to allow a free flow of air. Do not cover the ventilation openings on the back cover.
If you intend to mount the TV to a wall,...
Page 7
Installation
7
ENGLISH
Kensington Security System
- The TV is equipped with a Kensington Security System connector on the back panel. Connect the
Kensington Security System cable as shown below.
- For the detailed installation and use of the Kensington Security System, refer to the user’s guide
provided with the Kensington Security System.
For further information, contact http://www.kensington.com, the internet homepage of the
Kensington company. Kensington sells security systems for expensive...
Page 8
8
Location and function of controls
[without ARC]
12 3
45 6
8 79
0
OK
LIST
MUTE
VOL
HOLD SIZE MIX TIME
REVEAL MODEUPDATEINDEX
VOL PR
PRTEXT PSM SSM
Q.VIEW
POWER
TV INPUT
MENU
SLEEP
I/II
ARC
?iM
10
12
13
14
15
9
3
4
5
6
7
8
1
2
11
16
13
[with ARC]
[with ARC]
OK
MUTE
VOLVOL PR
PRTEXT PSM SSM
MENU
SLEEP
I/II
*
[without ARC]
SSM PSM0
SLEEP TEXT
UPDATETIME
SIZE MIX
HOLD
REVEAL
INDEX MODE?
iM
*
POWER MUTE
TV INPUT I/II
LIST
PR
PR VOL
OK
123
456
789
SSM PSM0
VOL Q.VIEW MENU
SLEEP ARC TEXT
UPDATETIME
SIZE MIX...
Page 9
9
ENGLISH
Location and function of controls
All the functions can be controlled with the remote
control handset. Some functions can also be
adjusted with the buttons on the top panel of the
set. Only the remote control handset supplied will
operate this set.
Remote control handset
Before you use the remote control handset,
please install the
batteries. See the next page.
1. POWER
switches the set on from standby or off to
standby.
2. NUMBER BUTTONS
switches the set on from standby and selects
a...
Page 10
10
Location and function of controls

87
87
1. ON/OFF (
r
r/ I)
switches the set on from standby or off to
standby.
2. INPUT selects the remote operating mode.
switches the set on from standby.
3. MENU selects a menu.
4. OK accepts your selection or displays the current
mode.
5.
F F
 / G
G
 (Volume Down/Up)
adjusts the volume.
adjusts menu settings. 6.
E E

 / D
D
 (Programme Down/Up)
selects a programme or a menu item.
switches the set on from standby.
7. REMOTE CONTROL SENSOR
8. POWER/STANDBY...


![Page 8
8
Location and function of controls
[without ARC]
12 3
45 6
8 79
0
OK
LIST
MUTE
VOL
HOLD SIZE MIX TIME
REVEAL MODEUPDATEINDEX
VOL PR
PRTEXT PSM SSM
Q.VIEW
POWER
TV INPUT
MENU
SLEEP
I/II
ARC
?iM
10
12
13
14
15
9
3
4
5
6
7
8
1
2
11
16
13
[with ARC]
[with ARC]
OK
MUTE
VOLVOL PR
PRTEXT PSM SSM
MENU
SLEEP
I/II
*
[without ARC]
SSM PSM0
SLEEP TEXT
UPDATETIME
SIZE MIX
HOLD
REVEAL
INDEX MODE?
iM
*
POWER MUTE
TV INPUT I/II
LIST
PR
PR VOL
OK
123
456
789
SSM PSM0
VOL Q.VIEW MENU
SLEEP ARC TEXT
UPDATETIME
SIZE MIX... Page 8
8
Location and function of controls
[without ARC]
12 3
45 6
8 79
0
OK
LIST
MUTE
VOL
HOLD SIZE MIX TIME
REVEAL MODEUPDATEINDEX
VOL PR
PRTEXT PSM SSM
Q.VIEW
POWER
TV INPUT
MENU
SLEEP
I/II
ARC
?iM
10
12
13
14
15
9
3
4
5
6
7
8
1
2
11
16
13
[with ARC]
[with ARC]
OK
MUTE
VOLVOL PR
PRTEXT PSM SSM
MENU
SLEEP
I/II
*
[without ARC]
SSM PSM0
SLEEP TEXT
UPDATETIME
SIZE MIX
HOLD
REVEAL
INDEX MODE?
iM
*
POWER MUTE
TV INPUT I/II
LIST
PR
PR VOL
OK
123
456
789
SSM PSM0
VOL Q.VIEW MENU
SLEEP ARC TEXT
UPDATETIME
SIZE MIX...](http://img.usermanuals.tech/thumb/47/53885/w300_lg_15lc1r-owner-s-manual-7.png)

